True One Owner 72 Roadrunner

Rdrunner72

Active member
Bought this car new from Katy Road Chrysler Plymouth, Houston, TX in June 1972.

440/4bbl High Performance, 727 Auto, P/S, Air Conditioning, Rallye interior (Tuff Wheel, guages, Slap Stix, bucket seats)

Other than changing the wheels to dish mags (put the stock ones on a boat trailer, then sold it in 1976...gahhhhh) the car is exactly as it rolled off the showroom floor. Normal replacements for belts, hoses, plugs, tires etc. etc. Have all records to include all gas/oil and the like. Also have window sticker and build sheet. Original list price was $4798.35, I paid $3653.36. Got a good deal as my father-in-law worked there as a mechanic.

Used as daily transportation until 92ish...then parked awaiting my retirement so I could fix it back up.

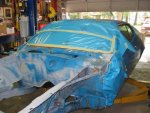
Here's a pix the day it entered the garage.

I'll add more of what's been happening since then.
 

Attachments

  • roadrunner_02__small_.jpg
    roadrunner_02__small_.jpg
    33.4 KB · Views: 173
Hey....welcome RdRunner72! Please introduce yourself to everyone in the "1st Time? Say Hi" section. We can always use more Runner's here! [smilie=w:
 
And this is what the engine looks like today, ready to be put back in when the car's ready for it.

.030 over pistons, Crane Cam (not too wild), roller rockers, Edlebrock manifold, Holley Street Avenger 670 carb, Schumacher headers, MoPar performance dress up valve covers and air cleaner, Holley fuel pump, high perf oil pump and a Classic Auto Air Sanden compressor air conditioning conversion kit. (not shown)

Note the orange dip stick...yes, that's the way it came from the factory. Don't know if it's supposed to be blue and the worker just grabbed the wrong one or what.

I'm not doing a full up, show "restoration". I want to keep the car with warts and all (like an orange dip stick), dress it up a little, and cruise the local Sonic Drive In on Saturday nights.

I am keeping all the stock stuff, cleaning it, and storing it in case I do want to go back and make the car like it rolled off the assembly line.

For now, nearly everything under the car from the front suspensnion/K frame to the gas tank and rear suspension/differential has been powdercoated satin black.
 

Attachments

  • finished_engine__01.jpg
    finished_engine__01.jpg
    40.2 KB · Views: 154
That is way to cool. congratulations for being able to hang on to her for all these years.

I look forward to updates on her progress.
 
Moving on...oh BTW I tried to add a pix to my name but can't seem to get it to "take". It meets all the criteria but all I get is a red "X"...

Anyhow, after pulling then engine out, I started stripping down the front end. Bumper, lights, suspension, fenders, everything down to the frame and radiator support.

In 1978 I moved to Indiana (thank's Air Force) and the land of chemicals on the winter roads, so I took the car to the local Ziebart shop and had it undercoated. Good idea as it preserved the car, i.e. NO RUST, bad idea in that if you haven't tried to take off Ziebart, you haven't known frustration. Best thing (assuming you don't have one of those mega bucks tanks to dip the car in, or a handy sand blaster capable of a whole car) is a hot gun and a putty knife...and lots of time!

At any rate, here's a pix of the car, specifically the inside of the fender well, BEFORE I started with removing the undercoating. Remember this stuff is all over the underside of the car, inside the fender wells, inside the area behind the lights, inside EVERYTHING!
 

Attachments

  • before_.jpg
    before_.jpg
    41.9 KB · Views: 131
And...here's what it looked like after removing all the undercoating. Didn't really keep track of how long it took to do this, just know these two pictures were about a month apart, 25 cases of beer, and a few hundred kilowats of electricity used for the heat gun! (this is the right side, the before pix was the left side...but they were both in the same conditon!)
 

Attachments

  • after_.jpg
    after_.jpg
    39.1 KB · Views: 129
Moving right along, here's a pix of the entire front end as it was approaching "paint day". Did some minor filling on deep scratches and a lot of sanding, grinding, sanding, grinding, on and on and on.

Original paint was the one shot factory enamel. I was going with Veriprime primer and a base coat/clear coat, all by DuPont. Learned one thing...paint has gotten EXPENSIVE!

Anyhow, the preparation for the actual painting was the most time consuming...
 

Attachments

  • prepped_and_masked.jpg
    prepped_and_masked.jpg
    47 KB · Views: 125
I mentioned the paint booth...here's a couple of pix...may have to use two posts as I haven't figured out how to put two in the same post.
 

Attachments

  • outside_the_paint_booth.jpg
    outside_the_paint_booth.jpg
    31.8 KB · Views: 122
And here's an inside view. Having it around the lift made it easy to move the car up and down, especially when trying to paint the bottom part of the frame.
 

Attachments

  • inside_the_paint_booth.jpg
    inside_the_paint_booth.jpg
    32 KB · Views: 119
This is after it was primed. Actual spray time was only about 20 minutes a coat. Used an HVLP gun and each coat took about a quart of paint, except for the primer which only took about half that amount. There were two of us, one mixing and filling the gun cannister, the other inside the booth doing the painting.
 

Attachments

  • primed_and_ready_for_color.jpg
    primed_and_ready_for_color.jpg
    32.9 KB · Views: 119
This is the finished product! Well worth the effort. Next will be pulling the doors off and painting the inside of them and the door frames. Also will be doing the inside of the hood, the trunk lid and the inside of the trunk itself. Lastly will be the body behind the rear bumper and the inside of the fenders.

The outside of the body I'll probably have someone else do, unless I feel I've picked up enough experience to try it myself. This is the first painting I've done to this extent. Considering the cost of paint, I don't want to screw up the exterior!
 

Attachments

  • better_than_new.jpg
    better_than_new.jpg
    39.1 KB · Views: 117
Last pix for a while as I'm off to Talladega in the morning. This is the engine compartment ready for the accessories, wiring, front suspension, and eventually the engine.

I'm leaving the fenders off to make it easier. Hardest part will be keeping from scratching all that beautiful paint. Will make things go slower I'm sure.
 

Attachments

  • ready_for_that_engine.jpg
    ready_for_that_engine.jpg
    35.7 KB · Views: 112
[smilie=e: [smilie=e: Looking GREAT!

BTW, something is wrong with our "pic loader" sorry....
 

SiteLock

SiteLock
Back
Top