My 71 Duster work in progress

ive done several driveway alignments that techs told me were close enough to not bother, and have developed a few extra tricks in my journey....
slick garage floors are GREAT but adding a layer of cardboard can make it even better
jacking up the car from the control arms to "release" the tires" is also very helpfull
dont bother measuring front to rear..instead measure to a fixed point say...t-bar junction on the frame rail or any of the "frame verification points" for a body machine

for "initial" ill get the cars ride height dialed in , at that point ill pull the bearing cap, and use the center point as a measurement to the ground, jack it up and block out the control arms at or as close to that height as i can get, toss on a bare wheel and you can use a level to calculate how much angle you have, i actualy have a modified bearing cap that a laser level bolts onto..with bare wheels its MUCH easier to measure side to side, but if your sitting extra low, it isnt an option so you just measure off the rails, by first measureing rail to rail then rail to wheel so you can do the same for the front and rear of front end thus you end up with ALL of the numbers in hand

useualy once youve gone thru and dialed it in like this you put the tires on run it round the block and then re-check it and see if anything "settled" youll useualy have to tweak something minimaly
 
Is it the distributor clicking, the control unit, or the coil? Not that I'd expect it from any of them. If it's a points setup, of course, the condenser could be saturating and firing across the points, but as I recall you've got a tach-drive electronic. Even with the key on, there's literally no voltage inside a Mopar electronic distributor until the distributor spins--the reluctor vanes passing the VR sensor generates AC voltage--so what could be clicking in there is a mystery to me. There was a rash of problematic MP Orange boxes for quite sometime that would actually buzz (which solid-state bits should not do) but I wonder if something's somehow firing your coil. I almost think one of the 340 Brothers (Greggles and Mr340) was one that had that issue but it's been years since it was mentioned.

i have had said buzz as well with a standard chrome box, the box wasnt the issue it was the dizzy pickup causing some kind of feedback, took me forever to figure out wtf was going on and why
 
Yeah you know with the power steering, I think factory spec caster is preferred. I could be wrong but I think increasing caster makes the car easier to steer, which is why you want it on a manual steering car. I might have that backward but I don't think so.

The distributor is definitely the source of the noise. I figured it was the big ugly yellow Accel coil, but no. It's already got an adapter on it so I'm tempted to just swipe the distributor off my 440 anyway.

I've been fiddling around with the backup light starter switch (BLSS). The harness was hacked and a reverse light has been added to the dash. Initially the female V-shaped end on the transmission harness was missing but I found one in a box of nuts and bolts that came with the car. Also, at first the dash light and I suspect the backup lights were plugged into the hot side of the two backup light wires. Changing that led me to find that I don't have continuity between the two pins with the shifter in reverse.

So far I've ohmed out the wires between the top and bottom, and need to put the car on stands to check the switch. It's got a B&M shifter in it so I may end up buying a backup switch for that instead of mucking around with the transmission. I remember having trouble getting a factory switch to work before.
 
ive done several driveway alignments that techs told me were close enough to not bother, and have developed a few extra tricks in my journey....
slick garage floors are GREAT but adding a layer of cardboard can make it even better
jacking up the car from the control arms to "release" the tires" is also very helpfull
dont bother measuring front to rear..instead measure to a fixed point say...t-bar junction on the frame rail or any of the "frame verification points" for a body machine

for "initial" ill get the cars ride height dialed in , at that point ill pull the bearing cap, and use the center point as a measurement to the ground, jack it up and block out the control arms at or as close to that height as i can get, toss on a bare wheel and you can use a level to calculate how much angle you have, i actualy have a modified bearing cap that a laser level bolts onto..with bare wheels its MUCH easier to measure side to side, but if your sitting extra low, it isnt an option so you just measure off the rails, by first measureing rail to rail then rail to wheel so you can do the same for the front and rear of front end thus you end up with ALL of the numbers in hand

useualy once youve gone thru and dialed it in like this you put the tires on run it round the block and then re-check it and see if anything "settled" youll useualy have to tweak something minimaly
Yep, I'm going to look into those ideas. That could be just the ticket.

FWIW I use two pieces of masonite, slick sides facing with grease between them, as "turn plates".

I've got a digital magnetic angle finder that I think will work to get me the caster and camber, but I need to rig up a laser also, to get the wheels straight and the toe right. Or maybe I could cobble together some kind of toe plate to measure it.

I'm 99% certain that I've done more real alignments than most of the alignment techs still working in this town. The last time I paid for an alignment I told the guy to give me as much caster as possible, and when I got the car back it would go in circles because one side had limited adjustability. I never imagined I'd have to explain that to the dumbshit. I took it straight back and they fixed it, but at that point I ordered a do-it-yourself setup that still works but needs improvement because I can.
 
Last edited:
Yeah you know with the power steering, I think factory spec caster is preferred. I could be wrong but I think increasing caster makes the car easier to steer, which is why you want it on a manual steering car. I might have that backward but I don't think so.
Positive caster increases straight-line stability at the cost of increased input effort. Negative caster eases the effort but with increased tendency to wander. The more positive caster the better, particularly with power steering.

At least, that's what the internets tell me.
 
That's the way I remember it too. I guess with the boat steering, wander would be bad. I hadn't considered that, and had focused on trying to stiffen the steering up a bit with less caster and not more (and definitely not negative).

We'll see what I can get around 1-1/2*. I figure I'll be lucky to get to factory spec (+3/4* according to the internet) with stock UCA bushings.
 
Today I rewired the backup light, neutral safety, and the brake light. Worked perfectly. Of course it didn't.

First, the backup light switch isn't working. Debating using a switch on the shifter instead of the transmission mounted one. It still works for a neutral safety switch. Maybe. Or maybe the starter's out now.

Weird coincidence, but I checked the wiring back to the starter relay, and when the shifter's in Park, it's grounded, when it's in reverse, it's open. I think that's all that is required of that circuit, to ground the relay so it will activate the starter.

I guess it could be the battery. I put it on the charger, and got it up to 12.5 v, but it still won't turn over. Maybe that's not enough to crank it over. I doubt it though. Will find out tomorrow. I quit for today.

Also, the brake light is sort of glowing again, which is why I spliced in a new wire. I checked it before and it seemed like that wire was grounding due to a split in the insulation. Or so I thought. It acted up again, so I spliced in new wire. That didn't fix it this time. Makes me think it could be related to the master cylinder bypass that came out of nowhere the other day.

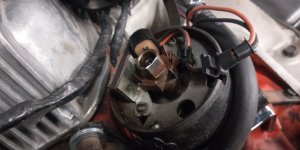
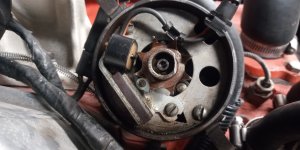
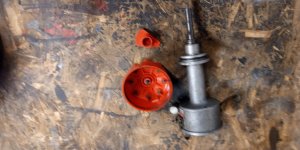
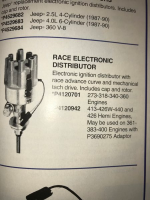
Here are some photos of the distributor that's in it, I took them hoping somebody can ID the thing. The reluctor and rotor button are unique so I guess it's a factory made electronic distr with a tach drive on it, not a converted dual point model. The tag on it says "Chrysler" and has a string of numbers after it. I couldn't even see it with my old man eyes. Another reason to take a photo.
20210710_192219.jpg20210710_192319.jpg20210710_192431_HDR.jpg

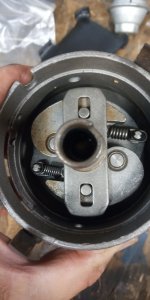
This is an old distributor I've got laying around I contemplated trying to use. The size of those advance springs caught my eye. They would probably limit the performance potential some.

20210710_190041.jpg

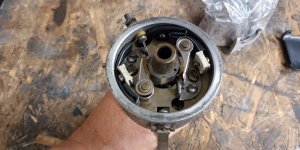
Finally, I've got this Mallory dual point that I'm trying to unload on a vintage oriented board (The HAMB). Nobody but one of those guys would want the thing these days.

20210702_191723.jpg20210702_191634.jpg20210702_191841.jpg
 
if i didnt have one allready....id take it....yes im a sucker for points! even with MSD i love my points...ever try and change a reluctor or pickup on the side of the road, let alone trouble shoot electrical issues on elec ign ...nah keep me a spare set of points im good

that tach drive unit is wicked cool and looks OE..maybe a boat unit? considering marine aplication stuff can get WEIRD..in fact i recently found out they made not only the b/rb aluminum fully baffled pan for boats and it will fit some trucks...but they also made em for LA's havnt verified if they make a 360 specific one....so a marine tach drive wouldnt suprise me in the slightest and in fact would make the most sense ...to which ill have to see if i can find one for the ramp truck in b/rb flavor

as for the switch yes..ground out in park/N for start is correct, to verify if ground out the pin on the relay directly to the battery and then see if it starts..or even cranks..if yes then youve got an issue with the wire between the relay and the switch..if no..then either the relay is shot or the trigger wire to the starter is disconected testable by hot jumping said wire at the relay with the key off as you dont need it to start just spin...if that fails youve got a trigger wire/starter issue


as for your dim light....that should have no bearing on anything....its a solitary circuit all on its own tied to nothing, dim tells me its a "bad" connection but that means it could be an internal contact or a crossed wire...hard to say with any certanty

found this

1625978367197.png
 
Yup, that's the tach drive unit that was in my Hemi when I got it. Quickly swapped out to a vacuum unit for better streetability.
 
The battery's charging again, hopefully that's the problem. If not I'll remember to check the relay itself before breaking out the BFH and taking it out on the car. Maybe. :D

The concern over the light is because WV has a safety inspection and they might reject the car with the brake warning light stuck on. It's the same reason the sticker on my truck has been expired since 2014. There I had to pull the ABS relay because it would activate any time I used the brakes. That doesn't draw attention, but the Duster is a different can of beans. Plus, I just like things to work right on a car I've basically taken apart and put back together.

Thanks for ID ing the tach drive distributor. I'm unsure if I'm going to replace it or not. Streetability won't be a concern with this bucket of bolts. I'm still looking at the top end of my 440 and thinking how easy it would be to just swap the distr out of it. Mancini also has the MP distributors relatively cheap. The site doesn't say for sure if it's one of the good ones that have the easy adjust advance curve or not (made by Mallory?) The 440 has one of those in it, set up ready to go for that motor anyway. But I also hate taking things apart that are working fine as is.
 
"if" my memory serves on the brake light on the dash..power in from fuse, ground out down to the prop valve is all it is...unplug the prop valve if it goes out its the presure switch on the valve if it stays dim then its grounding out somewhere before the switch
 
I noticed yesterday that when I unplug the brake wire at the prop valve the light goes completely out.

I just rechecked all the wiring I did yesterday and there's nothing wrong with any of that. At one point there wasn't any power at all, so I even checked the wiring from the battery though the other side of the fusible link and found no problem. When I hooked that back up I had power to the dash but only got one click out of the starter. Don't ask me if it still has power because at that point I said fuck it, disconnected the battery, and walked away.

While I was mucking around with the trans wiring, I noticed the wire to the starter is bare and green as a gourd. I was poking around in there with a shop vac yesterday cleaning out cobwebs so I probably fouled up the connection. I tried taking photos but a phone is useless as tits on a boar hog when it comes to using it in the dark under a car.

I'm unsure what comes next. I think it's going to turn out to be just the wiring, but that's cold comfort given that I can't even see the connections due to that stupid insulation. It seems to be a mini-starter although I can't really see it. The insulation probably contributed to the corrison by holding mositure all those years. It might even be the reason the starter is grounded since it has shiny metallic shit on the outside of it and is band-clamped to the starter. Finally, there doesn't look as if there's room to get the starter out of there without at least unbolting a header. The starter seemed to be working fine yesterday so hopefully it won't come to that.

Fuck me running.
 
The tach-drive distributor is definitely the MP piece. I think I mentioned back yonder that I've got the same unit in the LA configuration that I've no intention on using due to its lack of a vacuum advance.

Streetability won't be a concern with this bucket of bolts.
I think the word more appropriate to @68R/T's comment would be "driveability". He knows from whence he speaks and I agree with him 100%. Unless this is a dedicated strip car, you absolutely want vacuum advance. Not only will the car drive much better, it'll get better fuel economy by an order of magnitude. Agnes was built primarily for the strip; there's still a vacuum advance on that engine because it will see limited street use.

I would use the distributor you showed with the factory advance springs. Get the Mr. Gasket advance-spring kit (925B) and replace at least the heavier spring with one from the kit (Mr. Gasket says use both on an awfulmatic). You could also potentially steal the ones from the MP tach drive.
Today I rewired the backup light, neutral safety, and the brake light. Worked perfectly. Of course it didn't.

First, the backup light switch isn't working. Debating using a switch on the shifter instead of the transmission mounted one. It still works for a neutral safety switch. Maybe. Or maybe the starter's out now.

Weird coincidence, but I checked the wiring back to the starter relay, and when the shifter's in Park, it's grounded, when it's in reverse, it's open. I think that's all that is required of that circuit, to ground the relay so it will activate the starter.
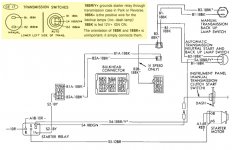
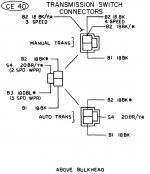
If I recall, you said Mothership was originally a manual-transmission car. Agnes was originally an automatic that became a 4-speed, so I was into this same nonsense, just the other way around. The "neutral safety" aspect of the transmission switch is the easy part; swappinig the NSS transmission pigtail and having the right switch is literally the hardest part. There's an extra wire on the auto (it should be 18G brown w/yellow tracer a.k.a. 18BR/Y*) to ground the starter relay.
The other two should be the same as a manual transmission: 18G black (18BK), and 18G black w/tracer (18BK*). The 18BK wire should feed 12V+ IGN ON to the NSS, while the 18BK* feeds that power to the lamps when the car's in reverse. I'll bet if you connected a +12V jumper from the battery to the 18BK* wire down at the transmission, your lights would test OK (including the one on the dash, if so equipped and connected). If so, it means you simply need 12V+ IGN ON on the 18BK wire. That wire should connect to cavity W on your bulkhead connector. On A-body 4-speed cars, there's a jumper wire on the harness connector (if the factory wiring diagram is to be believed; on my car it's a jumper wire right at the bulkhead disconnect) that leads to bulkhead cavity C. It should also be 18BK*. That wire feeds the dash warning lamp, which grounds through its case.

Too much typing... let's go to the FSM wiring diagram, which I cleaned up for clarity. The yellow-shaded area was my addendum for the switch wiring. Only wiring related to the NSS (auto) or reverse-lamp switch (manual) and neutral safety switch is shown:

71NSS.jpg

The diagram should increase in size if you click on it.

With your test light or DMM, check for power at cavity W with the key in the RUN position. If the FSM is correct, it should also show power in ACC. If there's no power there--and I suspect there isn't--there's your problem.

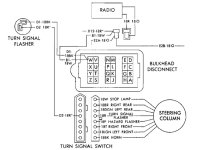
Tracing the interior side of the wiring over a couple of pages, it would appear that the 18-gauge white (18W) wire that feeds the reverse-lamp circuit is fed off the radio connector?! The FSM shows the two-pin radio connector, probably long gone from your car, as having 18W and 18R (red) wires on the top part of the "T" formed by the two terminals. The other wire should be 18O (orange) on both sides of the connector (dash illumination). My suspicion is that someone performed a bris on that connector whilst hacking a radio in there at some point. Look for an orphaned 18-gauge white wire and check for continuity betwixt its free end and cavity W.

The interior side of cavity W should also have an 18BK wire that feeds 12V+ to the turn signal flasher. Near as I can figure, the 18W is the only wire feeding that circuit as well. Do your turn signals work?

Once again, a (simplified) diagram is worth a thousand words. This is how the interior side of cavity W is wired:

71NSS-Int.jpg


There was something else I was going to address in this post, but spending the last hour in Photoshop has gutted that thought process thoroughly. 😂
 
Last edited:
It's worth noting for casual viewes (meaning anyone not @b-body-bob ):

The above diagrams are from the '71 FSM, just cleaned up. Other (later?) FSMs show a 3-pin connector in the NSS harness rather than the direct wire to the starter relay; I know this because I've run into it a few times but I can't remember on which cars.

Also, the bulkhead connections shown should be regarded as '71 A-body only. I started with a '73 manual and it was completely different in both cavity labelling and layout, though the wiring colors seemed to be consistent.

Check the FSM for your year; don't assume the above will work for every Mopar!
 
back to the brake warning light on the dash..if you unplug it from the prop valve and it goes out, then you have a prop valve issue..be it trapped air, bad sensor, etc

doc i think the diagram for the wiring is right no matter hwat mopar your working on trucks and vans included, tho pin position on the firewall changed, even the color codes and "under car" pig tail to the trans did not
 
The connector definitely changed to a 3-wire even though the color coding did not. This is the connector layout shown on '73 A-bodies:

73NSSplug.jpg
 
OK then. :D

I got the starter wire off fairly easily. Let's hope it doesn't go farther than that.

The corrosion ran up under the insulation, it is extensive.

I wired it up with that wire completely out of the circuit (out of the car for that matter) and the dash lit up as expected. I don't understand why it was acting like it did before, and not lighting the dash up, except maybe there was so much resistance in the circuit that nothing else would light up. And by lighting and light up, I mean show signs of life. FWIW the battery had gone down about 1/2 v, kind of playing into my excessive resistance idea.

Now to find a replacement cable and hope for the best..
 
If I recall, you said Mothership was originally a manual-transmission car.
Nope. Somebody put those pedals in there, probably about the time some idiot painted it orange.

The backup light/NSS circuit is about as simple as it gets. I don't like passing the 12v through the transmission switch though, but I didn't design it so don't blame me.
 
I don't like passing the 12v through the transmission switch though, but I didn't design it so don't blame me.
It's no different than passing 110V through the light switch on your wall... except that one at least has a fighting chance at starting a fire or electrocuting you. :D
 
I installed a new cable to the starter and the dash lights up and the starter cranks again. I need to get some of that heat insulation wrap for it though because it runs right between the back two header tubes. The other cable was kind of formed and stiff, but this one, not so much.

It's kind of weird the way a corroded cable that worked fine all at once went bad and shorted the whole car out, all from poking around with a shop vac. That'll teach me for trying to clean things up.
 

SiteLock

SiteLock
Back
Top