My 71 Duster work in progress

As far as the hose to the carb, just bend up a steel piece and use rubber on either end. That's what I did on mine. It's still semi-hokey, but I don't trust rubber hose... at least not for long. I try to keep its length as short as I can wherever possible. I don't even really like the -AN braided stuff I have from the tank to the pump, but I couldn't find 1/2" steel tubing easily.

What I do trust is nylon oil-pressure tubing. I've never seen it fail, though I've heard of it melting when someone stupid enough let it rest on something hot (hint: the block doesn't get hot enough). I even know of an instance with sufficient pressure to blow apart the brass bourdon tube inside the oil-pressure gauge but the nylon held just fine. What I have seen is copper work-harden and crack due to vibration. It's admittedly pretty rare, but leave a nice gradual bend, maybe even a loop like brake lines leaving the master cylinder, to absorb vibration over a greater length. The "nylon is failure-prone" thing is a wives' tale that persists without reason or logic.

It's always the little shit you don't consider that kills the budget. Fittings, sealant, hardware, $500 driveshafts... 😁

Gina hopped in and revved the shit out of it for a while so I know there's no smoke, black blue or white, with it warmed up running in the garage, and there's no unburned fuel floating around in the air so that's good. Fuel pressure bounces between 6 and 8 with the car running.
This made me giggle, likely because I pictured a big ol' grin on her face while she was doing it. Glad to hear the pressure looks good and that you've got better results in the smoke and vapor departments than I.

Like your blue pump, the noise from the Carter pump goes away when the Valiant's started. Unlike the A12 car, the Valiant has full exhaust with mufflers and resonators, so it's pretty bearable inside, even without the back seat (under which the pump is mounted).

It sounds like a productive day... wish I could say the same. *taps foot waiting on parts*
 
Yep I always leave loops in the copper line. The nylon's ancient so it's time to replace it.

But, I ended up under the dash ripping out the stereo wiring. The PO had wrapped wires around wires, like he was playing cat's cradle under there. It started as just clearing out a clear path for the oil pressure line, and ended up with the back seat out and scrubbing the floorboard and trunk under/behind the seat. Oh and the seats too. It was funkier than Bootsy Collins back there.

It was a good productive, but long, day.

I noticed some weirdness back there. One example, the seat back was screwed to the floorboard with a self-tapping screw. I didn't even see a place for it to have been bolted down from the factory, but there has to be one, right?

I almost forgot the biggest news. I backed it out to move it around and settle the suspension. Turned the wheel to the left, and BAM autosteering to the lock. I like to never got the wheels straightened up to pull it back in. The header is awfully close to the thing on top of the gearbox that needs adjusted, I hope that's not going to be a problem. A quick google says move it but doesn't really say which way.

ETA I checked the FSM and it says to loosen the two bolts, torque them to 7 lb/ft, then tap it "up or down until there is no movement of the steering wheel when the engine is started or stopped". I take up or down to mean towards the front and rear of the car.
 
Last edited:
It started as just clearing out a clear path for the oil pressure line, and ended up with the back seat out and scrubbing the floorboard and trunk under/behind the seat. Oh and the seats too. It was funkier than Bootsy Collins back there.
Heavens... that's pretty funky. Have you thought of referring to the car as "Mothership" henceforth?

I noticed some weirdness back there. One example, the seat back was screwed to the floorboard with a self-tapping screw. I didn't even see a place for it to have been bolted down from the factory, but there has to be one, right?
Nope. I was surprised to find that, uh, "feature" on the Valiant. It pretty-much just hooks into place. No bolts, unlike the B- & E-bodies I've had.

I almost forgot the biggest news. I backed it out to move it around and settle the suspension. Turned the wheel to the left, and BAM autosteering to the lock.

ETA I checked the FSM and it says to loosen the two bolts, torque them to 7 lb/ft, then tap it "up or down until there is no movement of the steering wheel when the engine is started or stopped". I take up or down to mean towards the front and rear of the car.
I assume you're talking about the spool valve assembly. Per the '70 FSM (which I happened to have open for some reason), when tapping "down" you're tapping on the end plug, which means you're moving the valve toward the core support (forward). For up, they're pretty clear about not hitting the valve body itself--tap the bolt head holding the spool valve assembly.

A friend recently had this issue on a GM box, which was a fresh-out-of-the-box reman. Manual, schmanual... he sent it back for a refund. I would almost bet the process is about the same on a Saginaw box. I don't think I'll tell him. 😁
 
The Mothership, I like that. But it's not funky now, I cleaned it up to at least Donny Osmond level.

I didn't see the mention to only tap the bolt in the 71 FSM, but OTOH it also gives two slightly different descriptions of adjusting it on the same page (19-13) in two different sub-sections. So there could be even more descriptions of it in there too. Anyway, good mention there, thanks.

I googled and didn't see a mention of adjusting the valve on a Saginaw. Doesn't mean it's not there, just that I didn't look for very long.

I worked on a couple of bicycles yesterday, no car activity involved.
 
Well that was easy. I thought it would be at least a little precise, because I had it in my head that you have to actually move the valve housing. It seemed like I was going to be chasing it back and forth.

Now that I've done it, it seems more that you're shocking the valve from one end to the other while the bolts are loose. That's not the way the FSM describes it, but otherwise I don't understand how 1) it can get out of whack to begin with and 2) why whacking it 3 times didn't just go from a full left to a full right auto steer.

Anyway, loosen them, torque to 84 lbs/in and whack whack whack, test, retorque to 200 lbs/in, done. I used a body hammer on the end plug and it corrected a left hand auto steering problem.
 
Excellent. Now I'll be prepared if I ever find myself owning a car with power steering. I'm still undecided whether it'll remain on the Imperial.
 
An Imperial without power steering? Unpossible!

I dialed in about 5* more timing and adjusted the carb to the baseline of 1-1/2 turns out from closed. It seemed to make a positive difference but it's still not snappy. I think it' needs a quicker advance curve and the timing was jumping all over the place so the distributor is probably worn out. The shaft feels loose to me. It's some sort of a 440 electronic distributor with a tach drive on it.
 
For timing, I would suggest starting at 35° total and letting the chips fall where they may in terms of initial. If you don't have a dial-back light, the "Big Fat Friend" timing method is very useful. If you've got a radical camshaft and (relatively) low compression like my Valiant, it might take a surprising--nay, alarming--amount of timing. In case you missed it, my 340 will start with 60°BTDC initial... not that I revved it or anything at that number. The method I was told to use was to set the idle, then advance the timing 3-5 degrees. If idle speed increases, reset the it then advance the timing again. Repeat until the idle speed remains constant, then back off to the last setting. This should be done with the vacuum advance connected (more on that in a minute).

I always used the MP lightweight spring kit, replacing the heavier of the two advance springs with one from the set. The MP item is long gone, but Mr. Gasket still makes them (part number 925B). In the directions, which I read for the first time the last time I installed 'em, they suggested using both lightweight springs on an awfulmatic and my standard procedure for a 4-speed. Who knew?! That being said, if your tach-drive electronic is like mine, it's likely already got at least one lightweight spring in it. More importantly, you don't have a vacuum advance. You absolutely want--need--a vacuum advance unless this is a dedicated drag car, which it isn't. The Mothership is for funkadelic cruises across the time/space continuum (and town). Agnes is closer to a drag car and has vacuum. Driveability and fuel economy both increase drastically with vacuum advance. It's like a different, much better, car.

In terms of your unstable timing, ask your distributor if its name is Jen (long story). It probably isn't, so check your runout carefully across a few different clock positions. I say "carefully" because you don't want to mistake endplay (up/down) for runout; endplay isn't a huge concern. If it was, the factory would've made the lower stop bushing a lot more precise. I can't recall exactly, but I think .006" or .008" is considered the limit... either of which is in the "feel but can't really see movement" neighborhood. Even if it's a little beyond that spec, I wouldn't fret too much with electronic ignition. The upper bushing in the electronic distributor doesn't take nearly the beating as the one with points since there's no axial contact in the former to trigger it. Of course, the tach drive gear would provide a constant source of single-direction axial load, especially while running a tach, so...

Anyhow, while you're in there put a few drops of oil in the wick or felt under the rotor. That's what lubricates the distributor's potentially-sticky bits, along with the upper bushing. Yes, it's important.

Next, you'll want to check your timing chain. Depending on your compression, you might want the plugs out for this. Turn the engine over by hand in one direction only until the timing mark on the balancer aligns with the highest reading on the scale on your timing cover in the direction you're turning: If you're turning clockwise, go to the highest mark after TDC (probably 10°) or BTDC if your turning CCW. Now reverse your direction of rotation while watching the distributor rotor. As soon as it moves even a touch, stop. Where's your timing mark? If you started at 10°ATDC and the mark is now off the scale in the BTDC direction, you need a new timing set. If it's more than about 3-4° I would still suggest a new one. Stretch might correct me, but we had a 340 in the shop last year with 4,000 miles on it since rebuild, with a "real good" Cloyes timing set (actually, the cheapest double-roller they make). There was something like 30° of chain slop. It was replaced with a Cloyes Street Billet set, which is a much better unit (see "Signet-ficant Other" for details/photos of the LA version).

Distributor is pretty OK and the chain checks out? That leaves only the distributor's drive tang, distributor/oil pump drive gear, and the block bushing in which the latter rides. Mark your distributor's housing and rotor position, then pull it. Look at the drive tang on the bottom. On that 340, it was badly worn. The part that contacted the drive shaft was rounded away from the flat part, which I'm sure was good for at least a few degrees of timing error. Take a large flat screwdriver and insert it into the drive gear where the distributor tang rides. Check for wobble (runout) being careful not to twist the screwdriver. Got some significant wiggle there? Mark the position of the drive slot and twist the shaft clockwise to disengage it from the cam, then pluck it out with pliers. Look for excessive wear in the area that it rides in the bronze block bushing. If that's OK, you may need a block bushing; I don't know of a good way to inspect it in-car. However, that area's pretty well oiled in the B/RB design and damage isn't common. The one in my old Six Pack engine was the 120,000+ mile original unit, having gone through the hot tank and rebuilding process with flying colors. Timing was as stable as my Uncle Bob (Bill was a bit of a loose cannon).

All of this stuff is really worth checking. Yeah, it's a lot more work but in the case of the 340 'Cuda we had quite the stackup effect happening. Virtually every potential problem listed above was present in some form; we replaced the distributor shaft, bushings, oil pump drive, block bushing and timing set. The owner wasn't thrilled to hear his total, but that vanished the second he drove the car. "It hasn't run this well in 30 years."
 
Excellent. Now I'll be prepared if I ever find myself owning a car with power steering. I'm still undecided whether it'll remain on the Imperial.
funny thing, i blew the PS on my 71 caddy...boy oh boy was that a brutal couple weeks before i found another one...and yes i was daily driving it at the time...probably close to 100 a day....nudged a curb once and fractured one of my hands ...the FORCE feedback was NASTY, but going down the road it was sooooo nice to feel everything

my 58 ford is manual and its not half bad, course its very..very long winded, ive got a factory "power assist" unit for it complete centerlink, hyd ram, tierods, hoses pump and brackets for the 312, but never could bring myself to puting it on
 
It took 3 tries but I got the front wheels pointed in the right direction and the steering wheel centered, so that was good.

The bad is when I fired it up to back it out and give it a try, the brake pedal went to the floor. I don't have any leaks, the MC is full, and it pumped back up, but that kind of took the wind out of my sails.

I've got no idea what could be wrong other than the master cylinder is junk .
 
nudged a curb once and fractured one of my hands ...the FORCE feedback was NASTY, but going down the road it was sooooo nice to feel everything
Yeah, try hanging on to a steering wheel when that spool valve is out of adjustment like mine was. I was pretty happy I turned loose when it took off and turned on its own.

FWIW, the short "drive" I did yesterday reminded me how much I hate the feel of Mopar power steering. It really is like piloting a boat - no feedback at all.

That's another thing that's likely to change when/if I go with a small block. But with the weight of a B motor and the hassle of even getting to it to remove it, it's there to stay until then. At least it doesn't leak - yet. I did have to rebuild the pump though, when filling the reservoir you might as well have poured it on the ground and skipped the temporary step.
 
I just checked, it is a new Raybestos MC36412
Well, at least it's got a lifetime warranty. Unfortunately, Raybestos has a "one replacement, parts only" warranty, meaning you won't get another if it fails in two years. You can only get a new cylinder, too--no cash refund. That kind of sucks, but it's gotten to be the way of the world in auto parts.


FWIW, the short "drive" I did yesterday reminded me how much I hate the feel of Mopar power steering. It really is like piloting a boat - no feedback at all.
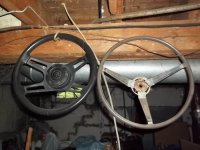
It's one of the reasons I'm happy with the manual box in the Valiant. I hope I will be with it in the Challenger, but not because of the additional weight up front. The replacement box I have is 16:1 instead of the normal 24:1--parallel parking should be interesting. Anyhow, I'm not sure what steering wheel you've got in the Mothership, but if it's the base wheel you'd do very well to get something smaller, around 14". The base steering wheel was for base cars with base options; i.e. it's a huge diameter to make manual steering easier. Going to a smaller makes a world of difference in steering feel. I really noticed it when I put a Tuff wheel in my Challenger back in 1988.

Of course, my heart says "Tuff wheel" for your car, but that can get pricey fast. Another factory option is the wheel I have for my Imperial, which was available in trucks, HorizOmnis/FWD cars, and J-bodies. It doesn't require an adapter collar like the Tuff wheel does. That one's shown here on the left... the difference in diameter to a "standard" wheel is evident:

100_3876.JPG


If I decide to keep power steering on the Imperial *gasp* I'll definitely be spending the long green on some Firm Feel parts, including an upgraded gear with firmer reaction springs. The smaller-diameter wheel is a must, though, since the factory wheel is both ugly and large.
 
ill toss my 2 bits in here

the "close ratio manual is a DREAM on the road, but SUCKS in parking lots....my 69.5 and is made better on the road with a smaller wheel but 10x worse in a parking lot

the close ratio power/police box and my understanding is the firm feel is basicly a copy of? is actualy nice with a stock wheel(67 fish)

also..wider tires/wheel combos on even a stock PS box actualy make it feel better as well as providing more feedback anything 225 and larger seems to just get better to a point, the preachers 69 i built is a great example..he went with a brand new firm feel(are they still local?) and gah it felt like crap..he was VERY insitant on stock tire size.....i MADE him try a set of my 225s and while it made it feel a ton better that box still felt like trash, but it did get him to up his tire size

as for the factory small wheel..the first few time i came across it i thought it was aGT wheel with a fancy OE center cap of some kind...and to be honest there is a GT wheel that copys it exactly sans center cap
 
The standard Firm Feel gear is a replica of the factory police unit, but they also offer boxes with even-higher-rate reaction springs to provide even more feel than the OE cop unit. There are two levels beyond OE available. They're still located in OR. They have a stellar reputation, unlike Steer & Gear. I've not bought one of their gears, but the other stuff I've gotten from Firm Feel has been of excellent quality.

The Grant GT that kind of looks like a Tuff wheel is actually very different. The spokes have a greater offset to them and enter the rim toward the back rather than centered on the inner diameter. It's sort of a "deep dish" wheel, and the grip is off by a mile. It's also painted where the OE unit is brushed stainless. Grant actually started making a "reproduction" Tuff wheel with a more-correct grip (it still looks like it was cut off with a razor knife at the spokes), but the finish and spoke depth/offset are still so far from right that I can pick out their repro in a thumbnail photo.

The reason I didn't go with a Tuff wheel for the Imperial was because the tilt-column adapters are almost impossible to find. Tilt columns were made by Saginaw (GM) so they use a different hub spline than the non-tilt columns.
 
hmm maybe its not gt then, i have one kicking around that i assumed was a gt, that could pass as a tough wheel except that the center is allen heads and a small horn button, could be a nardia or any one of the other brands for all i know...grabbed id over 2 decades ago with a grant button in it

dont get me wrong ive got nothing but good to say about firm feel themselves, as i personaly went in with his box and talked to them, they gave me another box to install ..picked up some other stuff from them on that day as well but i couldnt tell you what, the new box was MUCH better , owner wanted the "stock" firm feel. which is only nominaly better going down the road...atleast on an a-body with a stock steeringwheel, imo it still needed a 225 to feel "right" ..maybe the one up from stock cop unit is the way to go?
 
Had a buddy go through some weird Twilight zone sh!t with his fuel pump push rod in a 383 years ago. Motor was running kind of funny, then just died like some switched off the ignition. We had to trailer the car to the shop and then dug into it, ended up discovering that the fuel pump push rod was missing!

We pulled the oil pan to look for it, cut open the oil filter, opened what we could to look and see...it was gone with no evidence what so ever that it had ever been in the motor! Put in a new push rod and started driving again.
 
The car came with a small Grant 3 spoke, nothing like a Tuff wheel. But I changed that by installing the stock wheel out of a 72 duster, and guess what, it had manual steering so the bigger wheel worked better there.

Thanks for pointing out that switching the wheel was a mistake. When possible you can set the caster to assist with the steering feel too. It can be hard on these old cars to get a lot of caster and maintain the camber where it needs to be.

Unless the engine comes out the steering box is what it is. FWIW another reason to dislike PS is the potential for leaks although the older I get the more I realize that hydraulic things are actually easy to rebuild/repair.

BTW, I've been having an adventure straightening out the front end. All the parts are different except the LCAs, so I started with the wheels sitting pretty wonky. I watched a video on one way to get the toe set, with string, but the front end is as wide as or wider than the rear end so that didn't work. Instead I took a measurement off the body at the door jamb with the string set to the front tire like the video set it on the rear. The need of a laser resulted in the use of string so it's less than accurate. But it's better now anyway.

When I ran an alignment rack, we did it with a 1/2" rod with a rubber tip on it so it didn't mark the car and the light shining back from the machine head. Center the steering wheel, walk back and with the rod at a known spot on the body (the lower corner of a door gap worked great), hold your thumb right on the rod at the light, then go do the same on the other side. When you got the second light where you thumb is from the first, the wheels are straight ahead.

Finally, I've been working on the wiring. Mostly just finding problems and ripping out fubars. But, standing around under the hood with the key on working with a DVM, I noticed that after a period of time, the distributor starts to click. Weird.

 
FWIW another reason to dislike PS is the potential for leaks although the older I get the more I realize that hydraulic things are actually easy to rebuild/repair.
Right up until you open up a Mopar PS gear (a.k.a. can of worms). Things can get tricky and ugly in there pretty quickly, especially the setup (reaction springs, etc.). Even Ehrenberg leaves that stuff to the professionals.

When I rebuilt the front end in the Black Bitch, my friend Andrew helped me "string align" the front end. We went for max caster and set the toe and camber with a (b-body-)plumbob, string, and a tailor's tape. We were shooting for "close enough" and a decent drive for the 40 miles from his house to mine--I had an alignment scheduled for 9AM the following Monday at NTW anyhow. I went to my appointment, the tech drove the car in, and about 10 minutes later came back out. He walked into the waiting area and handed me my keys. "It's so close it's not worth spending $70 to correct." I told him what we'd done, and he said "Your friend knows what he's doing. I'm not going to mess with it." I was on my way with no bill. It drove really well but I'd no idea Andrew had nailed it that closely.

One way to get additional caster is to use the Moog K7103 Problem Solver offset bushings and install one of them backwards. I've never done it personally, but apparently you can get loads of caster by doing so. The front bushing should have the arrow facing the tire, the rear points toward the engine. Of course, if you've already installed new UCA bushings... move along, nothing to see here.

Is it the distributor clicking, the control unit, or the coil? Not that I'd expect it from any of them. If it's a points setup, of course, the condenser could be saturating and firing across the points, but as I recall you've got a tach-drive electronic. Even with the key on, there's literally no voltage inside a Mopar electronic distributor until the distributor spins--the reluctor vanes passing the VR sensor generates AC voltage--so what could be clicking in there is a mystery to me. There was a rash of problematic MP Orange boxes for quite sometime that would actually buzz (which solid-state bits should not do) but I wonder if something's somehow firing your coil. I almost think one of the 340 Brothers (Greggles and Mr340) was one that had that issue but it's been years since it was mentioned.
 

SiteLock

SiteLock
Back
Top