You are using an out of date browser. It may not display this or other websites correctly.
You should upgrade or use an alternative browser.
You should upgrade or use an alternative browser.
'75 W300 repair/mod project - Ol' Blue
- Thread starter gomopar440
- Start date
gomopar440
Livin' my life...one gas station at a time.
(long akward silence)...........................................................(/long akward silence)
Sorry about the delay in posting/replying here. It wasn't because of anything anyone posted here, so we're still all good here as far as I'm concerned. My internet connection was shut off for a couple weeks, and wasn't able to get it turned back on until today. I've been keeping busy on the truck to pass the time, so a lot got done since the last post.Basically the engine is all back together and installed with the new clutch. I've still got to go over all the mounting bolts and torque them down, but as of this afternoon I feel like I've finally gotten it over the hump. It still needs a bunch of little stuff bolted on, hooked up and dialed in, but I just might be able to get it running by this weekend if all goes well. :helpme:
BTW: Now that I can get online again, I need to get this picture hosting thing sorted out soon so I can post the pics I've been taking of the progress.
gomopar440
Livin' my life...one gas station at a time.
Nope. Hadn't known about or used that forum function yet. Let me look into it and I'll see what I can do for getting the pics back up again. Ever since PB pulled that stunt, this thread is kinda like having a connect the dots book, but with nothing to draw with.
71ChargerRT
Well-known member
I use RA, a lot, especially when it's not an emergency situation. As a matter of fact I just ordered a bunch of parts for my Durango, including a $10 heater hose that O'Reilly's wants $40+ tax. I buy local when I can, but I'm not going to worry about who's working or not working, brick and mortar stores are not going away in my lifetime, but there is an online market and the economy will shift and jobs will adjust. The last time I went to something at my kid's school they showed how my elementary aged kids jobs likely don't even exist yet, even more likey in the technology sector.
The money I earn, like everyone else, are moments of my life that I sell and I want to get the best value I can for my minutes.
Anyhow, I really like the truck GoMo, let's see some pics!
The money I earn, like everyone else, are moments of my life that I sell and I want to get the best value I can for my minutes.
Anyhow, I really like the truck GoMo, let's see some pics!
gomopar440
Livin' my life...one gas station at a time.
The alternator belt kinda took up half my day today.:doh:
After I torqued down all the loose bolts left to go from yesterday I mounted up the PS pump and set it and the alt at their inward most positions to ready them to take on the belts. When I put the alt belt on, it went to the end of the adjustment in the slotted arm and the 15460 belt was still loose. The PS belt fit fine though. So I took the alt belt with me to town so I could see what was up with it. The local Car Quest and Napa both had the same size belt listed in their computer system as being correct for my truck/engine combo. Both places had trouble figuring out the belt sizing even with me telling them how to figure out a smaller size (didn't bother with the paper catalogs. Rather than beating my head against the wall with them I headed out to the big town of Butte, 30 minutes away one way, to see if the AZ guys could do any better. Lucky for me, the manager was on duty and I have had pretty good luck with him finding weird stuff before. He took the alt belt in back and brought out a few others to try. I chose the smallest one of the lot, a 15435 to try. The manager said it might be too small, but I disagreed and bought the one I picked out. I should have listened to him... Yep, the slotted adjusting arm had plenty of room to fit the belt I got, but the body of the alt hit the engine block/WP before I could get the belt over the alt pulley.:doh:So, I headed out back to Butte to get a belt sized in the middle of the two. I ended up going with a 15450 belt. When I got home again it was dark out, but I tried it on the alt by flashlight just so I could verify this last belt fit. Bingo. It looks like I'll still have about an inch left in the adjustment slot in the lower arm to take up any belt stretch over time.:giggedy:
The old pics will take me a while to go back and repost, but let me at least try attaching the latest ones here.
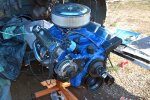
First pic was how far I had the engine assembled before installing it back in the truck.
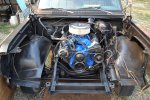
Second pic is the prepped engine bay ready to swallow the engine.
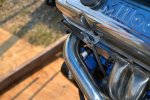
Third pic shows the bracket I welded to the dipstick tube. It allows me to mount it to a valve cover bolt now since the headers don't have a mounting point for it like the original manifolds did.
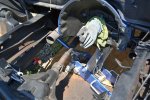
Last pic looks funny, but it's like that for a reason. This was taken after the first attempt at installing the engine. The headers were hitting the frame, so I pulled the engine back out and cut a couple clearance notches in the top of the frame rails. The rag and glove were placed over the already greased up input shaft to keep the grinding crap from sticking to the greased on the shaft and splines. Kinda looks like the truck is saying "gimme, gimme, gimme!!!", asking for the engine back.:bwuhaha:
After I torqued down all the loose bolts left to go from yesterday I mounted up the PS pump and set it and the alt at their inward most positions to ready them to take on the belts. When I put the alt belt on, it went to the end of the adjustment in the slotted arm and the 15460 belt was still loose. The PS belt fit fine though. So I took the alt belt with me to town so I could see what was up with it. The local Car Quest and Napa both had the same size belt listed in their computer system as being correct for my truck/engine combo. Both places had trouble figuring out the belt sizing even with me telling them how to figure out a smaller size (didn't bother with the paper catalogs. Rather than beating my head against the wall with them I headed out to the big town of Butte, 30 minutes away one way, to see if the AZ guys could do any better. Lucky for me, the manager was on duty and I have had pretty good luck with him finding weird stuff before. He took the alt belt in back and brought out a few others to try. I chose the smallest one of the lot, a 15435 to try. The manager said it might be too small, but I disagreed and bought the one I picked out. I should have listened to him... Yep, the slotted adjusting arm had plenty of room to fit the belt I got, but the body of the alt hit the engine block/WP before I could get the belt over the alt pulley.:doh:So, I headed out back to Butte to get a belt sized in the middle of the two. I ended up going with a 15450 belt. When I got home again it was dark out, but I tried it on the alt by flashlight just so I could verify this last belt fit. Bingo. It looks like I'll still have about an inch left in the adjustment slot in the lower arm to take up any belt stretch over time.:giggedy:
The old pics will take me a while to go back and repost, but let me at least try attaching the latest ones here.
First pic was how far I had the engine assembled before installing it back in the truck.
Second pic is the prepped engine bay ready to swallow the engine.
Third pic shows the bracket I welded to the dipstick tube. It allows me to mount it to a valve cover bolt now since the headers don't have a mounting point for it like the original manifolds did.
Last pic looks funny, but it's like that for a reason. This was taken after the first attempt at installing the engine. The headers were hitting the frame, so I pulled the engine back out and cut a couple clearance notches in the top of the frame rails. The rag and glove were placed over the already greased up input shaft to keep the grinding crap from sticking to the greased on the shaft and splines. Kinda looks like the truck is saying "gimme, gimme, gimme!!!", asking for the engine back.:bwuhaha:
Attachments

69.5CUDA
Blah Blah Blah
when i go lookin for old v8 belts, i wont even give them an aplication, just a length by way of a chunk of wire or a marked old belt
from my experiances with 4x frames id NEVER trust cutting the front rails, when abused they LOVE to crack from the shock tower bolts, what you cut out is all that was holding my RC frame together when i tossed its frame out....since the engines out you should consider pulling those towers and checking around the bolts since it looks like its either not cracked out not cracked out far enuf to be noticed
from my experiances with 4x frames id NEVER trust cutting the front rails, when abused they LOVE to crack from the shock tower bolts, what you cut out is all that was holding my RC frame together when i tossed its frame out....since the engines out you should consider pulling those towers and checking around the bolts since it looks like its either not cracked out not cracked out far enuf to be noticed
gomopar440
Livin' my life...one gas station at a time.
Thanks for the heads up, but the engine is actually in the truck now. It has been since Monday or Tuesday, I just don't have a pic of it sitting in there yet. I will be adding some steel back in there to box that section when I can get a chance to do so. For now, I have to get this truck running ASAP. I'm still without a working vehicle here when my wife is out somewhere in her Jeep.
Today I got a bit more of the detail work taken care of, mostly on the pass side of the engine. I made numerous repairs to the wiring on that side of the engine, fixing some really messed up stuff in places. Next I removed the old heater hoses, where I found more silicone, this time gooped up in between the heater core pipes and the hoses. The PO must have owned stock in Permatex from as much of the stuff I've found all over the place so far.:doh: The heater control valve works fine, but it was pretty rusty all over. It was cleaned up and painted while the heater hoses were still off. I went to town and got some new heater hoses, rubber fuel line and hose clamps, as well as a new fuel filter since the old one was loaded with crud. I didn't like the idea of having a plastic fuel filter anywhere near the headers, so I made sure to pick up a metal one instead.
The carb was bolted in place temporarily so I could route everything to it. I had to swap to 2.5" studs and put the shim and gasket stacks back on under the 1/2" spacer to get enough clearance for the hard fuel line I picked up. Those shims and gaskets won't be staying though as I've already ordered a 1" phenolic spacer to take the place of everything that's between the carb and intake right now.
The alt and PS belts both fit fine. They were able to be brought up to the proper tension within their available adjustment ranges.
No pics today as I headed over to a neighbors place (one of the local Mopar guys) this evening. I bought a set of factory valve covers and air cleaner off one of his busted up demo derby cars for $20. A little while and one bee sting later, I finally got the valve covers pulled off. It was easier said than done with the home made zoomies and having to figure out how to work around the engine being set back in the frame about 6-8" farther back than factory. I ended up using tin snips to cut away a portion of the firewall above the rear of the covers and was finally able to get them extracted from the car. I left my Milodon valve covers in their place so they'd be out of my way, and so his engine wouldn't be left open to the elements (no hood). When I got home it was a little to dark out to take progress pics, so I took the new-to-me valve covers to the barn and started cleaning them up. Once the worst of the grime was gone, I used the angle grinder to remove most of the brackets hanging off them. One stubborn bracket actually pulled a small chunk of the base metal off with it. So in addition to the cleaning, I'll have to weld that hole shut. That'll have to be dealt with tomorrow though as it's past midnight here and I'm done for today.
69.5CUDA
Blah Blah Blah
more often than not i found the 4x frame to spider crack under the lowwer shock towwer bolt first, bonus is you can pull the tower at any time with the engine in place, but if you find any cracking, be prepared to pull the engine so you can weld up both sides of the crack...more often than not the repair is to weld em up and then weld in a 1/4-1/8th inch plate from top to bottom sandwiched on the inside of the rail as wide as it is tall...even with un-repaired cracks this always permanently solves the problem..hell if you can get a really tight fit between the rails i kept one of mine from cracking worse under heavy abuse without welding it..think of it as a reinforcing backing pad
gomopar440
Livin' my life...one gas station at a time.
Today was mostly spent on getting the factory valve covers and air cleaner finished so I could close up the engine. I cleaned up the other valve cover like the first and spot filled a few minor dents while I was at it. I gave it a coat of primer and then welded up the hole I put in the other valve cover. The weld area got smoothed over with a flap disk and water was used to check for leaks. No leaks were found, so that valve cover also got a few spots of filler, then some primer. The filler was sanded down and feathered in and another coat of primer was used to seal it. I painted them the same gunmetal grey I'm using on all the sheet metal parts. I also painted the factory breather, PCV valve and oil cap gunmetal grey. The new PCV grommet fit after spraying it with some silicone spray lube. The big breather grommet was too small to fit in it's hole, so I had to clean up and reuse the original one for that hole.
The factory air cleaner doesn't use the same size as the one I had already bought when I checked it out today, and didn't appear to be easily modifiable. Rather than just buy another filter, I decided to take what I needed from the factory air cleaner and adapt it to the air cleaner base I already have. All I needed from the factory air cleaner was the breather inlet nipple, so I cut it out with an angle grinder first. Then I separated the scrap metal from the nipple part and then made eight small cuts in the folded over part. I was able to fold the inner nipple flange inward. This left me with a way to crimp the nipple into the base of the aftermarket air cleaner. I set the base on the carb and then held the nipple up under it to see where it would clear everything. I picked a spot just behind the vacuum secondary pot and right above the carb stud at that corner. I used a uni-bit to open up a hole, just enough for the nipple to slip in place. Then I supported the nipple from below with a piece of scrap wood and peened the nipple flaps over until they clamped the nipple tight to the air cleaner base. I sealed the nipple with a little Ultra Grey RTV inside and out since it was placed inside the center area of the air filter. I used a short piece of 5/8" heater hose on the nipple to connect a 90* elbow to it. The breather on the valve cover was connected to the elbow with another piece of the same heater hose. The PCV and the brake booster both got new hoses as well.
Here's a pic of where I left off for today. Tomorrow I'm going to tackle everything on the driver side of the engine compartment first. Then I'll be putting the front end back together and getting the radiator and fan installed. After that I'll look around for any loose ends that need to be tied up, and hopefully be able to start it.:dance:
Attachments
gomopar440
Livin' my life...one gas station at a time.
The spacer showed up in the mail today, so that got installed first. I removed all the other shims and gaskets as well as the 1/2" spacer, but I left the large heat shield piece in place. The longer carb studs I installed the other day were the perfect length, so I didn't have to mess with those. I had to readjust the throttle cable after bolting the carb back down, but I was able to leave the fuel hose and distributor vacuum attached to the carb during the swap.
The starter is in and the engine is all wired up now. I also bolted up the collectors with some ultra copper RTV on the gaskets. I didn't like how close the spark plug wires were to the header tubes, so I ran to town and picked up some high temp wire wrap. The stuff like header wrap, but smaller and tube shaped for spark plug wires.
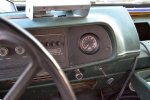
I didn't want to chop up the factory tach panel to put in the aftermarket tach I picked up (a copy of the old mini SunPro Super Tach II) so I had to come up with another solution. I made my own panel out of some scrap sheet metal, using the cardboard that came around the gauge as a template for the circle cut out. To keep the panel from flexing, I bent the edge over where it meets up with the center gauge panel. I used a small socket and a fat center punch to dimple the screw holes like the factory piece. There was quite a bit of pitting on the face left after I sanded it, so I gave it a skim coat of body filler to fill the pits. After the filler cured and was sanded back down I sprayed the new panel with satin black. I taped off the tach face and painted the bezel satin black as well. After the paint dried I mounted it in the dash, I was glad to see that the panel blended in almost perfectly with the factory part of the dash. I did have to add two small pieces of vacuum hose over the two screws near the middle of the dash to get the spacing right though.
I didn't want to reinstall the radiator support as rusty as it was, so I spent a fair amount of time working on it with a random orbit sander. There were also a few dented/wrinkled places, mostly on the lower corners, that were straightened back out with some pliers and a hammer. After that, it got sprayed satin black and left to dry.
The bananaflage hood was bolted on just as the sun was going down, so I'll have to get pics tomorrow.
The starter is in and the engine is all wired up now. I also bolted up the collectors with some ultra copper RTV on the gaskets. I didn't like how close the spark plug wires were to the header tubes, so I ran to town and picked up some high temp wire wrap. The stuff like header wrap, but smaller and tube shaped for spark plug wires.
I didn't want to chop up the factory tach panel to put in the aftermarket tach I picked up (a copy of the old mini SunPro Super Tach II) so I had to come up with another solution. I made my own panel out of some scrap sheet metal, using the cardboard that came around the gauge as a template for the circle cut out. To keep the panel from flexing, I bent the edge over where it meets up with the center gauge panel. I used a small socket and a fat center punch to dimple the screw holes like the factory piece. There was quite a bit of pitting on the face left after I sanded it, so I gave it a skim coat of body filler to fill the pits. After the filler cured and was sanded back down I sprayed the new panel with satin black. I taped off the tach face and painted the bezel satin black as well. After the paint dried I mounted it in the dash, I was glad to see that the panel blended in almost perfectly with the factory part of the dash. I did have to add two small pieces of vacuum hose over the two screws near the middle of the dash to get the spacing right though.
I didn't want to reinstall the radiator support as rusty as it was, so I spent a fair amount of time working on it with a random orbit sander. There were also a few dented/wrinkled places, mostly on the lower corners, that were straightened back out with some pliers and a hammer. After that, it got sprayed satin black and left to dry.
The bananaflage hood was bolted on just as the sun was going down, so I'll have to get pics tomorrow.
Last edited:
gomopar440
Livin' my life...one gas station at a time.
I looked around when I went out to the truck today and found that none of the front end hardware was cleaned up yet. That ended up burning up a LOT of my time today. The heat blisters on my finger tips are an unpleasant side effect of standing in front of the wire wheel far too long. After everything got cleaned up and painted, I started putting the rad support on the front. All the pieces needed a bit of persuading with a hammer here and there due to all the prior damage. I'm not swapping out the fenders at this time, just the hood for now.
After I had the front end pretty much bolted together, I started sanding the front and driver side edge of the hood as well as the upper part of the driver fender. All the bare metal got a coat of grey primer for now.
I tracked down the wiring diagram in the FSM and located the connection points for the tach power and light wires. I'll look for a ground wire attaching point close by under the dash and put the ground wire there. Pin 21 on the firewall connectors should be the tach signal wire, but if it's not or it's not there then I'll pass the green wire through the firewall using one of the existing grommets. I'll be adding male and female spade connectors to the four tach wires about 6" from the back of the gauge. That way I'll have an easy way to pull the tach without having to run down all the other wire ends. I didn't get all those wires hooked up today, so I'll have to finish that tomorrow.
Next I put the radiator back in place and bolted it down. I cleaned up the hose clamps and rad hoses and checked them for fit. There was enough excess hose material on three of the ends that I was able to cut away the deformed rubber there. The lower hose at the rad wasn't long enough to cut, so I left that end alone. Once the hoses were on and clamped down tight, I mounted the fan on the water pump.
Now that everything (but the battery) was hooked up, it was time for the oil and radiator fluid to go in. I put five quarts of 5W30 in the engine and I have another one standing by to allow for the new oil filter. The radiator fluid started going in next, but wasn't quite as uneventful as the oil. Shortly after I started filling the radiator, I heard fluid leaking out from below. A quick look pinpointed it as coming from the missing petcock at the bottom of the radiator. I had forgotten to replace it after the original one fell apart when I originally removed it from the radiator. I couldn't find a spare lying around, so I used a standard 1/8" pipe plug for now. Once that was in place, I added about four gallons of radiator fluid to it. With the upper reservoir, it's supposed to hold another quart of fluid, but I haven't bolted that on yet.
Lastly I put the battery in and hooked the cables up to it. Before trying to crank it over, I pulled the distributor plug so it wouldn't fire the coil just yet. I cranked it for about a minute so the oil pump would get a chance to fill the oil galleries without the engine running. There's engine assembly lube on all of the moving parts, so they have that to keep everything lubed up until the oil can get there. Next I turned the electric fuel pump on to prime the fuel system and let me get a reading on the gauge on the fuel line. The fuel pump was sounding different than I remember, and quite a bit louder than normal. The fuel pressure gauge wasn't registering anything, so I turned the pump off. I disconnected the fuel line going into the filter and it was dry. Then I checked at the line coming out of the fuel pump, it was also dry. The fuel line going into the fuel pump was also dry. I took off the gas cap and used an air nozzle to blow into the hose coming from the tank to clear out any obstructions. I could hear air rushing into the tank, but it wasn't gurgling or splashing anything at all. I had two gallons of gas in a can so I added that to the tank. I tried blowing air into the hose again and still didn't hear any bubbling or splashing going on. It's already sundown, so I'll have to get some gas to put in the tank tomorrow.
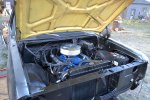
I did manage to snap a few pics of the engine in place and just about ready to go, as well as a pic of the new tach in the instrument panel piece that I made for it.
After I had the front end pretty much bolted together, I started sanding the front and driver side edge of the hood as well as the upper part of the driver fender. All the bare metal got a coat of grey primer for now.
I tracked down the wiring diagram in the FSM and located the connection points for the tach power and light wires. I'll look for a ground wire attaching point close by under the dash and put the ground wire there. Pin 21 on the firewall connectors should be the tach signal wire, but if it's not or it's not there then I'll pass the green wire through the firewall using one of the existing grommets. I'll be adding male and female spade connectors to the four tach wires about 6" from the back of the gauge. That way I'll have an easy way to pull the tach without having to run down all the other wire ends. I didn't get all those wires hooked up today, so I'll have to finish that tomorrow.
Next I put the radiator back in place and bolted it down. I cleaned up the hose clamps and rad hoses and checked them for fit. There was enough excess hose material on three of the ends that I was able to cut away the deformed rubber there. The lower hose at the rad wasn't long enough to cut, so I left that end alone. Once the hoses were on and clamped down tight, I mounted the fan on the water pump.
Now that everything (but the battery) was hooked up, it was time for the oil and radiator fluid to go in. I put five quarts of 5W30 in the engine and I have another one standing by to allow for the new oil filter. The radiator fluid started going in next, but wasn't quite as uneventful as the oil. Shortly after I started filling the radiator, I heard fluid leaking out from below. A quick look pinpointed it as coming from the missing petcock at the bottom of the radiator. I had forgotten to replace it after the original one fell apart when I originally removed it from the radiator. I couldn't find a spare lying around, so I used a standard 1/8" pipe plug for now. Once that was in place, I added about four gallons of radiator fluid to it. With the upper reservoir, it's supposed to hold another quart of fluid, but I haven't bolted that on yet.
Lastly I put the battery in and hooked the cables up to it. Before trying to crank it over, I pulled the distributor plug so it wouldn't fire the coil just yet. I cranked it for about a minute so the oil pump would get a chance to fill the oil galleries without the engine running. There's engine assembly lube on all of the moving parts, so they have that to keep everything lubed up until the oil can get there. Next I turned the electric fuel pump on to prime the fuel system and let me get a reading on the gauge on the fuel line. The fuel pump was sounding different than I remember, and quite a bit louder than normal. The fuel pressure gauge wasn't registering anything, so I turned the pump off. I disconnected the fuel line going into the filter and it was dry. Then I checked at the line coming out of the fuel pump, it was also dry. The fuel line going into the fuel pump was also dry. I took off the gas cap and used an air nozzle to blow into the hose coming from the tank to clear out any obstructions. I could hear air rushing into the tank, but it wasn't gurgling or splashing anything at all. I had two gallons of gas in a can so I added that to the tank. I tried blowing air into the hose again and still didn't hear any bubbling or splashing going on. It's already sundown, so I'll have to get some gas to put in the tank tomorrow.
I did manage to snap a few pics of the engine in place and just about ready to go, as well as a pic of the new tach in the instrument panel piece that I made for it.
Attachments

Last edited:
69.5CUDA
Blah Blah Blah
as much as i love the clock, tach, and "extras" in those latter dashes, i could never get myself to like the overall shape compared to the clean lines of the earlier version...regardless, that tach install is top notch!!!
your makin me jelly cause i wish i had the spare time to attack my ramcharger and your going to the lengths i plan to do
those fingers are sore from doing bolts arnt they.....i gave up wheeling bolts i just stick em in cardboard and toss em in the blasting cab any more
your makin me jelly cause i wish i had the spare time to attack my ramcharger and your going to the lengths i plan to do
those fingers are sore from doing bolts arnt they.....i gave up wheeling bolts i just stick em in cardboard and toss em in the blasting cab any more
gomopar440
Livin' my life...one gas station at a time.
If I had a better blasting cabinet I'd probably do the same. Mine is a HF floor model cabinet that leaks like a sieve and has holes in the gloves. I try to save it for the jobs where I just can't get the parts clean by any other methods. When I do use it, I come out blackened from head to toe. I won't go anywhere near the thing without a respirator as I definitely don't want the dusty black crap that gets all over the barn to get into my lungs.
Last edited:
69.5CUDA
Blah Blah Blah
replacement gloves can be ordered, and a lil foam camper tape goes a LONG way for re-sealing them up, heck if youve got a shop vac that you can hook up to it as well youll find you love it again
ive got some big ole monster (just big enuf for wheels and or a bmx bike frame just fits)that ive had to re-seal up and replace the glass..while i "can" use it without the vac it clouds up in a few seconds to the point of zero visibility
ive got some big ole monster (just big enuf for wheels and or a bmx bike frame just fits)that ive had to re-seal up and replace the glass..while i "can" use it without the vac it clouds up in a few seconds to the point of zero visibility
gomopar440
Livin' my life...one gas station at a time.
I got the fuel pump issue figured out now. It's amazing what a little gas can do to quiet one of those down. :doh:The low level of gas wasn't the only problem I found though. The wire between the float hinge and the cap was completely missing, rust ate a hole through the pickup straw about 1/2" above the bottom (NBD) and I found a hole in the brass float. Just to get it working, I left the float and wire issues alone for now. I cleaned all the rust off the pickup tube assembly and reinstalled it into the tank. I added 10 gallons of premium fuel to the tank. I used premium, not because the motor requires it, but because that's the only grade of fuel that I can get without ethanol in it around here. Before I reconnected the rubber fuel line to the pickup tube, I slipped a very small funnel into the rubber hose and poured a little fuel into it. Then I reconnected the rubber hose to the tank pickup tube and tightened the clamp. Putting gas directly into the fuel line allowed me to prime the pump and get enough suction started for it to pick up fuel from the tank. The pump was a lot quieter and I was getting 3lbs of pressure at the carb feed line. It didn't start when I cranked it over, but I did at least verify that I'm getting fuel to the carb float bowls now. More to come after I get back out there and do a bit of troubleshooting on it a little later.
gomopar440
Livin' my life...one gas station at a time.
The distributor plug was hooked back up and the coil wire still was on.
I'm thinking there's a discrepancy in the FSM on the distributor rotation order. In the engine section of the manual, it shows the distributor rotating clockwise. In the wiring diagram section, it shows the distributor as rotating counter-clockwise. The firing order is shown the same on both pages, with only the direction of rotation being different. The rotation being reversed would explain the hiccups and belching flames from the carb that I'm getting now.
I'm going to do a little more research online to verify which direction the 440's distributor is supposed to rotate. If anyone knows the answer off the top of their head, feel free to post it here.
EDIT: Yep. I was right about the rotation. Mine is definitely set up CW and I verified in a few places that it's supposed to be CCW. Now I get to cut off all my neat spark plug zip tie wire spacers, redo the wire order and then redo those spacers all over again. Ok off I go to get to work again. Wish me luck.
Last edited:
gomopar440
Livin' my life...one gas station at a time.
:wall:
I was able to get the plug wires reset for CCW rotation without having to cut the wire separators. Then I reset the engine to TDC on the intake (compression) stroke and pulled the distributor to verify the oil pump drive was installed properly. Yep, the distributor drive slot is still lined up front to back, running parallel to the cam and crank. Then I reinserted the distributor and lined up the rotor tip to the #1 terminal on the distributor cap. I left the distributor slightly loose so that it was tight enough to stay where I put it, but still able to move by hand. I verified the coil wire and distributor plug were both connected before trying to start it again. I had a helper turn it over while I kept an eye on it under the hood without any luck. Now I'm not even getting the coughing and sputtering like I was before. :hmmm:
I was able to get the plug wires reset for CCW rotation without having to cut the wire separators. Then I reset the engine to TDC on the intake (compression) stroke and pulled the distributor to verify the oil pump drive was installed properly. Yep, the distributor drive slot is still lined up front to back, running parallel to the cam and crank. Then I reinserted the distributor and lined up the rotor tip to the #1 terminal on the distributor cap. I left the distributor slightly loose so that it was tight enough to stay where I put it, but still able to move by hand. I verified the coil wire and distributor plug were both connected before trying to start it again. I had a helper turn it over while I kept an eye on it under the hood without any luck. Now I'm not even getting the coughing and sputtering like I was before. :hmmm:
gomopar440
Livin' my life...one gas station at a time.
Still no luck on getting it to fire up yet, but I think I figured out what's wrong. The choke is missing from the carb (open vacuum port) and there's another port open on the metering block above the idle screw. This carb had a manual choke on it that was broken and I want to replace it with an electric choke. Right now I don't have the money to buy an electric choke, so I'll most likely reattach the old choke to close off that vacuum port and wire it open for now. I should have a vacuum cap that should fit the other port around here somewhere.
I got the tach wired up, but without the engine running all I can do is test the back light for now (it works).
The battery was sounding a little weak by the time I gave up trying to start it, so I put a trickle charger on it before I headed in for the night.
In between messing with trying to start it and wiring up the tach, I bolted up the washer bottle and external reservoir/overflow tank for the radiator. I didn't bother trying to wire wheel the old screws today since I had some new hardware here that fit perfectly.