
You are using an out of date browser. It may not display this or other websites correctly.
You should upgrade or use an alternative browser.
You should upgrade or use an alternative browser.
tiny...aka 1958 lloyd
- Thread starter 69.5CUDA
- Start date


71ChargerRT
Well-known member
I'm with you Boot, I visit every couple weeks...
Coming along excellent 69, that hood looks great!!!
Coming along excellent 69, that hood looks great!!!

69.5CUDA
Blah Blah Blah
my health has been slowing..well stalling me the last few weeks :doh:
anyway heres some work i got done today..its not much but its something
anyway ..the "fill" panel section is being welded directly to the fender NOT the hood..tho the hood is tacked to keep it from moveing on me
i "tryed" useing folded sheetmetal to give a finished edge and cutting my work load down...that went right out the window due to the curve slope and angle all it left me with was ALOT of warping and tweeking and cutting...soooo once im done makeing the fill panel i will have to come back with an edge panel and then a roll and a drip rail section...NOT easy but within my abilitys and availible tools
the cowl is proveing to be trickky PITA work..note the "red" line that line WILL be the hood edge where it meets the cowl..the curve is the same angle as the windshield frame and has a VERY elegant finished line to it..the bonus is no mater what way the hood opens it wont have clearance issues
the hood IS going to require a TINY reshapeing..1 slice down the center as ive changed the angle a bit and another chop in the nose center above the grill to pull it in tward the car to compensate for the change of angle i did to the sides
anyway heres some work i got done today..its not much but its something
anyway ..the "fill" panel section is being welded directly to the fender NOT the hood..tho the hood is tacked to keep it from moveing on me
i "tryed" useing folded sheetmetal to give a finished edge and cutting my work load down...that went right out the window due to the curve slope and angle all it left me with was ALOT of warping and tweeking and cutting...soooo once im done makeing the fill panel i will have to come back with an edge panel and then a roll and a drip rail section...NOT easy but within my abilitys and availible tools
the cowl is proveing to be trickky PITA work..note the "red" line that line WILL be the hood edge where it meets the cowl..the curve is the same angle as the windshield frame and has a VERY elegant finished line to it..the bonus is no mater what way the hood opens it wont have clearance issues
the hood IS going to require a TINY reshapeing..1 slice down the center as ive changed the angle a bit and another chop in the nose center above the grill to pull it in tward the car to compensate for the change of angle i did to the sides
Attachments


69.5CUDA
Blah Blah Blah
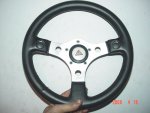
ohh yeah also got my steering wheel :giggedy:
note that the "stock" lloyd horn button fits into the GT horn button location...with only a ever so tiny amount of sanding to the horn button retaining ring where the center sits
my only complaint is that GRANT was an IDIOT on where they deemed a "good" location for the seam(lowwer left not top center)
note that the "stock" lloyd horn button fits into the GT horn button location...with only a ever so tiny amount of sanding to the horn button retaining ring where the center sits
my only complaint is that GRANT was an IDIOT on where they deemed a "good" location for the seam(lowwer left not top center)
Attachments

gomopar440
Livin' my life...one gas station at a time.
The angle on that second pic just makes me think of an old snub-nosed COE. Definately looking good the way it's all coming together!
Are you going to carry that radius at the A pillar back along the top of the door/quarter to window junctions? That would blend the 4" extensions in all together even better IMHO.
Are you going to carry that radius at the A pillar back along the top of the door/quarter to window junctions? That would blend the 4" extensions in all together even better IMHO.
gomopar440
Livin' my life...one gas station at a time.
Just weld the curve to the bottom pieces and then weld in a straight vertical back to close it up maybe. That way you should still be able to remove the separate parts like original. My 2C.
69.5CUDA
Blah Blah Blah
Wow, really taking shape.
its not "taking shape"...its just "following shape" of the image in my mind thats been there since day 1 :shifty:

1 slice down the center as ive changed the angle a bit and another chop in the nose center above the grill to pull it in tward the car to compensate for the change of angle i did to the sides
That'll be great. I was trying to figure out i my mind what the hood needed and that's exactly it.
Maybe it's just the pictures, but it seems like the hood rises up from the cowl to he nose. I think it might just be an optical illusion, but a slice and a chop would seem to be the thing to get rid of that illusion.
Amazing work, Kirk.
69.5CUDA
Blah Blah Blah
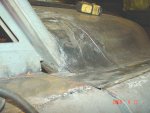
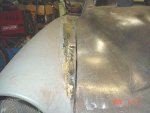
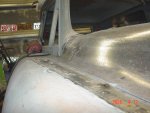
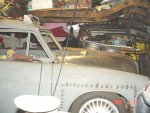
lots of stitching..a MASIVE cleanup of the hood to fender gap...its now perfect and the pic's prove it
ive got some sculpting to do for blending the fender into the new fill section to the hood but its not half as bad as it looks
the cowl is comeing along nicely and the roll that still sticks out is soo small you cant stuff your pinky into it..once i extend and tube the drip rail it will blend seamlessly
still need to cut the fender off once the cowl is done..but for now its all welded as 1 piece to make my life easyer
note the pic's of the hood halves..this should help explain what work i have to do to get the halves back together...also note that the front lowwer edge will be cut back ruffly 3 inches and then lip rolled to match the body
ive got some sculpting to do for blending the fender into the new fill section to the hood but its not half as bad as it looks
the cowl is comeing along nicely and the roll that still sticks out is soo small you cant stuff your pinky into it..once i extend and tube the drip rail it will blend seamlessly
still need to cut the fender off once the cowl is done..but for now its all welded as 1 piece to make my life easyer
note the pic's of the hood halves..this should help explain what work i have to do to get the halves back together...also note that the front lowwer edge will be cut back ruffly 3 inches and then lip rolled to match the body
Attachments




69.5CUDA
Blah Blah Blah
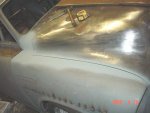
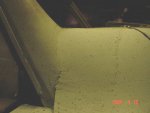
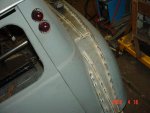
did more work on the fender and cowl..cowl is blending in like it was born there...the fender extension is essentialy done on this side so i shot a lil weldable primer on to look for pinholes
fully stitch welded up one of the door seams and finished off most of the passenger rear quarter stitching
welded up countless amounts of floor pan welds(less than half)...its nice how they stand out for the shot LOL with the soot
fully stitch welded this half of the cowl into place too
boy is my face sun burnt...i really should get a auto dimming helmet [smilie=f:
fully stitch welded up one of the door seams and finished off most of the passenger rear quarter stitching
welded up countless amounts of floor pan welds(less than half)...its nice how they stand out for the shot LOL with the soot
fully stitch welded this half of the cowl into place too
boy is my face sun burnt...i really should get a auto dimming helmet [smilie=f:
Attachments




gomopar440
Livin' my life...one gas station at a time.
:giggedy:
I've seen those auto dimmung helmets at Harbor freight for less than $50.:toot:
I've seen those auto dimmung helmets at Harbor freight for less than $50.:toot:

Diplomat_Wagon
Hiding In The Bushes While
Wow, that looks simply amazing!!!! :giggedy:
A question here 69.
Which way is the hood going tro open?
A question here 69.
Which way is the hood going tro open?
69.5CUDA
Blah Blah Blah
not sure yet ...im thinking tip forward, but working on a tip forward is a PITA but requires less strong of a latch....and the area for hinges is already strong on both the hood and theres nice rails to mount hinges to(thinking trunk hinges from a cuda)
tip back would require fabbing up alot of support for hinges in areas ive yet to build and ive had my share of hoods pop up.....the thought of it poping up with this much work....freaks me out
clam shell is a cool idea but im not sure i can live with how unclean looking the hinge down the center of the hood is..unless i could find a piece of trim to clean it up
build hood and cowl...then figure out how to have the hood open LOL
tip back would require fabbing up alot of support for hinges in areas ive yet to build and ive had my share of hoods pop up.....the thought of it poping up with this much work....freaks me out
clam shell is a cool idea but im not sure i can live with how unclean looking the hinge down the center of the hood is..unless i could find a piece of trim to clean it up
build hood and cowl...then figure out how to have the hood open LOL