Summer project

restoman

The paint fumes have cleared so I'm
Or more aptly sub-titled: What fat old retired bodymen with nothing better to do get themselves into...

My '74 Super Beetle.

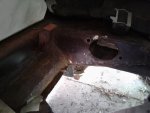
When I rebuilt this car back in '94 - '95, the original right floor pan was still serviceable. Surprising, to say the least, as the rest of the car was pretty tough. How tough? Let's just say that I was embarrassed that a bodyman like me bought such a HUGE pile of rusty, cobbled together shite... Fixing it or scrapping it were the only options, and as it was really my wife's car, fixing it was the only sane (?) option.

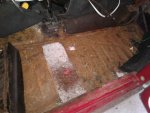
Fast forward to 2020... and the original floor is in desperate need of replacement. Leaky wiper arm shafts seals helped it along greatly.

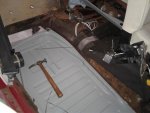
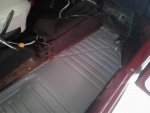
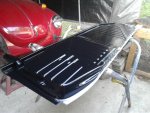
So out came the credit card and the phone and some $1200 later, I've got nice, new German-made floor halves, and a host of other stuff to repair what I've been putting off for years.

I've forgotten just how cramped it is working on the floors of these things. Probably 15 years since I've had the pleasure (???) of VW floor/heater channel work. I would have been quite happy to wait another 15 years.
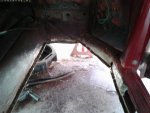
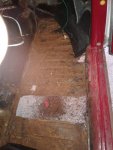
But the floor is coming out. All the perimeter bolts came out, save for one. A little cutting and vise-gripping inside the one rusted and now-cut-out area of the heater channel solved that. Kind of impressive, considering that Wolfsburg assembly-line folks put the bolts in there, back in 1974, and this car has spent it's entirety in Ontario.
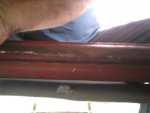
The seat tent is out, and it's an apparent victim of the afore-mentioned leaky seals that killed the floor. Another hit to the CC...

I'm pretty slow moving these days (some days I'm like a sun dial), so pics will be sporadic, but for anyone that's interested, they'll be here.
Day 1: Actually it's Day 2, but these are the first pics, so...
 

Attachments

  • floor 1.jpg
    floor 1.jpg
    69.5 KB · Views: 8
  • floor 2.jpg
    floor 2.jpg
    69.9 KB · Views: 8
Hot, hazy and humid weather has slowed down any progress for a few days.
Rain in the forecast for the next 36 hours, so...

Stay tuned.
 
It’s ridiculous out there.
I’m trying to get my damned pool up and running. It’s too hot.

Yes. It’s too hot to own a pool. Well, this particular pool, anyway.
 
I actually like the heat and humidity... and really didn't mind working in it throughout my career. Painting in humid booths was a problem, but...

Now that those days are over, if it's too sticky, I choose to sit in the shade and do as little as possible.
Rye helps pass the time. ;)
 
A solid 2 weeks to get this far... and my back is letting me know that it would be ok if we didn't go any farther.

A couple hours today took care of the remainder of the original welds, seam sealer, rust, etc.
One small patch is required on the bottom of the heater channel, and where one of the running board bolts goes into the side of the panel, but overall, I'm happy that no large-scale surgery is required here.
The driver's side is a different story: At some point someone swapped in an incorrect floor pan and welded it to the heater channel. I didn't want to get into that back in '95, and seeing as how the pan was solid enough, I left it alone. Now, although the floor is still good, the heater channel itself is at the point where a total replacement is needed.
Oh goody...
But, a couple of right side pics to tide you over for now. :)
 

Attachments

  • floor 3.jpg
    floor 3.jpg
    81.9 KB · Views: 6
  • floor 4.jpg
    floor 4.jpg
    83.9 KB · Views: 6
One month later...
For most of July it was simply too hot to be stuck inside a small car, cutting, grinding, fab'ing and welding.
The last week has been better. Not better enough to speed me up, but better enough that I didn't have to wring myself out every 20 minutes.
If you've never had the pleasure of replacing floors in a Beetle, let me give you the highlights of the process:
#1 It sucks. No other highlights are really necessary, but I'll add a few more to kill time.
#2 The floor pan halves are a combination of welds and bolts. Welded along the transmission tunnel and front frame head, and bolted along the heater channel and rear crossmember. Sounds easy, but truthfully, fully welded floors are easier to replace, unless one has the body removed on a weld/bolt chassis. As you can see, the body remains attached here. If I was doing this anywhere close to a hoist or overhead lift system of any kind, I would have separated the body from the chassis. A bit more work, yes, but an infinitely easier job. Arguably better, too.
#3 It sucks.

But, even though I don't yet have pics, it's all together.
Fitted, bolt holes cleaned out, heater channel patched, seat rails, battery hold down bolt & jack support bracket welded in place, welds are sand blasted, etch primed and seam sealed (with proper urethane seam sealer), body gasket in place, patch panel for rear crossmember fab'd up & welded in, battery hold down bracket, front seat tent and heat cable tubing all welded in place. The pan is fully welded to the tunnel and frame head, and securely bolted up to the heater channel and crossmember.
I still need to slide underneath and clean up the weld penetration areas and etch prime, seam seal and paint them, but for all intents and purposes, the lion's share of the nasty stuff is done.
On the passenger side, anyway...
 

Attachments

  • bug 5.jpg
    bug 5.jpg
    79.2 KB · Views: 3
  • bug 6.jpg
    bug 6.jpg
    76.4 KB · Views: 3
Two good coats of good 'ol Tremclad on the underside and all along the mounting surface. The pass. compartment area will get a couple of coats before the sound deadener goes down, but that won't be for a while yet...
 

Attachments

  • bug 4.jpg
    bug 4.jpg
    121.3 KB · Views: 2
The heat tube inside the heater channel is solid and rust free.
There still won't be much heat in the car, but at least the cause won't be rotted out heat tubes!
 

Attachments

  • bug 3.jpg
    bug 3.jpg
    53.9 KB · Views: 4
What is the benefit of sandblasting the welds? Is that something I should have done on the valiant floor pans? Should I go back and blast all my welds? Is that somthing I should be doing on all welds, body and chassis?
 
Blasting ensures that it's all clean, before putting epoxy, etch primer, filler, whatever, over top.
Even with MIG welding, as clean as you think you might have gotten everything before welding, the impurities and other crap that the gas blows away from the puddle is still there, usually on top of the weld. Grinding gets rid of most of it, but some does remain. Sand blasting gets it outta there! That pretty blue metal surrounding the welds isn't a great substrate for primers or filler to stick to, either...
In this case, I didn't do much grinding on the welds, so blasting ensures that it's clean before the etch primer and seam sealer go down.
It's something I've been doing for so long, I never think to mention it. It's a habit from way back, when oxy/acetylene was the go-to for panel repairs and replacement.
 

SiteLock

SiteLock
Back
Top