You are using an out of date browser. It may not display this or other websites correctly.
You should upgrade or use an alternative browser.
You should upgrade or use an alternative browser.
Satty's got cancer...
- Thread starter mr340
- Start date


mr340
I don't always drink beer, but when I do
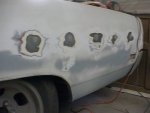
Managed to get a little more done over the last few evenings. First I decided that the cheap side moulding had to go. Pulled the piece off the QP to find it was hiding the original side chrome mounting holes :wtf:. :hmmm: What to do with those little buggers... I know...eliminate them... Sounded like a good plan, so off to work I went. Filler in the ones on the QP, and it looked good. So, off with the rest.....bad idea.... there are 21 of them bastages on each side!!! Oh well guess I'll trudge on....
here is the results... Before :
here is the results... Before :
Attachments


")
RUSTY Cuda
In over my head!
welder broken? :huh: Rich.
mr340
I don't always drink beer, but when I do
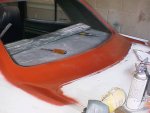
After... I'm thinking of leaving it this color and just shooting a clear coat over it.
Hey, Rich, I don't have gas for the welder, and I'm too lazy to do all that grinding, besides, if I decide to reinstall the chrome, I'll still be able to get to the holes...
Hey, Rich, I don't have gas for the welder, and I'm too lazy to do all that grinding, besides, if I decide to reinstall the chrome, I'll still be able to get to the holes...
Attachments


Da-ho
not even
OOO KKKKKKKKKKKKKKKKKK................... If you say so. Good progress regardless.:bravo:mr340 said:After... I'm thinking of leaving it this color and just shooting a clear coat over it.
RUSTY Cuda
In over my head!
OK, coat the back with something waterproof(don't ask how I found out!!!!!!!!!:dgt: )
On the clear wont hurt to shoot a small section & see what develops, I still may do the 73 that way if my body work sucks too much! Rich.
On the clear wont hurt to shoot a small section & see what develops, I still may do the 73 that way if my body work sucks too much! Rich.
mr340
I don't always drink beer, but when I do
This is how it will look after it's cleared... Waddaya think?...RUSTY Cuda said:OK, coat the back with something waterproof(don't ask how I found out!!!!!!!!!:dgt: )
On the clear wont hurt to shoot a small section & see what develops, I still may do the 73 that way if my body work sucks too much! Rich.
Attachments


Last edited:


gomopar440
Livin' my life...one gas station at a time.
Looking good! I like the black on the hood there. Yup!
mr340
I don't always drink beer, but when I do
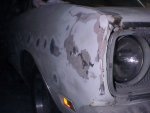
I'm going to leave it primer/black, I think it looks pretty good like that. Sometime in the future I may change things some, but for now I;m just playing with different ideas as I go along....
Attachments


Last edited:
gomopar440
Livin' my life...one gas station at a time.
For some reason I'm thinking the tail panel area would look better with the colors reversed. Black in the middle with the red primer surrounding it.
mr340
I don't always drink beer, but when I do
You sir are correct, but that is what every one else would do. If I was going to go back to white, I would definately do it that way. Besides, thegomopar440 said:For some reason I'm thinking the tail panel area would look better with the colors reversed. Black in the middle with the red primer surrounding it.
P L Y M O U T H stands out berred against the black as opposed to the red... It's gonna be a never ending project, so things might change in the future anyway
gomopar440
Livin' my life...one gas station at a time.
I don't know about everyone else, but yea, that is how I would do it with those two colors.
If it were mine though the whole thing would be flat black. There's something about big cars all blacked out that just screams NASTY! In a good way of course...
If it were mine though the whole thing would be flat black. There's something about big cars all blacked out that just screams NASTY! In a good way of course...