69 Barracuda FB. The next evolution

Looks pretty good in the pic, I wish he would have shown the bottom, that's usually the worst part, maybe you can get him to send you that pic, both sides look ok as far as rust goes?
It's down south some 2 1/2- 3 hours from me depending on traffic it could be much worse summer time & south jersey traffic sucks, everybody (cept me) goes down the shore!
 
I wasn't sure how far away it was located from you. I wouldn't ask you to drive that far for me. I'm still waiting for a reply about my question to the seller about if there is any bondo or rust.

It's been way too hot today (100+) to stay out in the garage more than a few minutes at a time. All I did was take off all four wheels and tires (car is already on jack stands), and then haul them around to the local tire shops looking for some tires. The car currently has 3 different sizes of tires and 4 different types of 14" rims. I had no luck finding any take off 14" tires anywhere, nor a wheel to replace that chrome Uni-Lug wheel. I did find a set of new 205/75r14 trailer tires and wheels, that would hold up the car and keep it level, but they would be $600 for 4. Rather than spend that money on what would eventually be a throw away set of wheels and tires, I bit the bullet and bought those tires (post #12) and wheels (post #8). Apparently those wheels are being discontinued, so I had to get two of them in black, and two of them in grey. Those four are likely the last of those wheels available in any color, and in that size, from the manufacturer. When they arrive, I'm going to take the wheels and get them powder coated. The final wheel color is still TBD...

 
Last edited:
First time messing with Google AI to generate an image. Not far off from what I have pictured in my head. The AI doesn't seem to know what an AAR hood or Ultra Warmonger 5 wheels look like.
 

Attachments

  • Screenshot_20260721_231137_Messages.jpg
    Screenshot_20260721_231137_Messages.jpg
    339.3 KB · Views: 6
It finally got into the low 80's last night after midnight, so I went out for a bit over 30 minutes and cleared out the interior of the car. Everything is cleared out down to the carpet, or what is left of the carpet.

Today was about 10 degrees cooler, so working out in the garage was easier. Just more cleanup and painting. That parts washer I recently picked up is working great BTW.

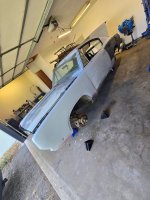
I took a pic of the car on stands with the wheels off. Now I have a flying fish. Lol
 

Attachments

  • 20260722_160740.jpg
    20260722_160740.jpg
    1.8 MB · Views: 3
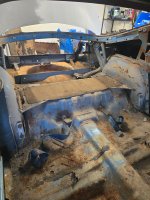
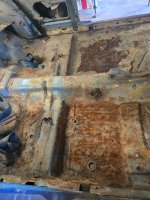
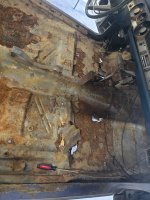
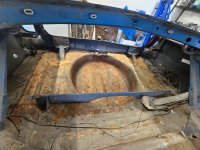
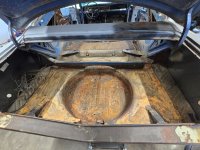
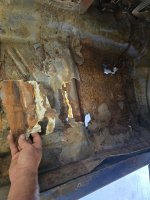
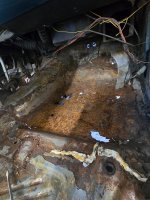
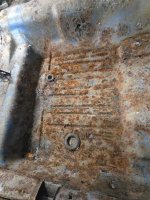
I just pulled the carpet up... When the seller said "The floor might have a few small holes in it.", I expected just that. What I got under the carpet was more like "The whole floor is made of holes.". 😱😳😵😵‍💫

At first I thought it was still possibly saveable. Maybe I could just do a few (a lot of) patches and be good. However, when I looked closer, I noticed that the smooth areas were oddly more smooth than the rust blisters everywhere else. Those smooth areas were actually fiberglass. Well, mostly resin with a single layer of fiberglass set on top of it. When I started poking around the edges of the fiberglass, it started coming up in thin crackly sheets. What shocked me more than the fiberglass, was what I found under it, was just more of that rust bubbled metal. I also found a very porous weld seam around the edges around the trans tunnel and part way up angle of the footwell. Porous enough that half of the seam had see through gaps, with no seam sealer anywhere around it.

I think I'm done for today. 🤦‍♂️
 

Attachments

  • 20260723_175352.jpg
    20260723_175352.jpg
    2.6 MB · Views: 4
  • 20260723_175356.jpg
    20260723_175356.jpg
    2.9 MB · Views: 3
  • 20260723_175401.jpg
    20260723_175401.jpg
    2.8 MB · Views: 3
  • 20260723_175415.jpg
    20260723_175415.jpg
    2.5 MB · Views: 2
  • 20260723_175424.jpg
    20260723_175424.jpg
    2.5 MB · Views: 2
  • 20260723_175457.jpg
    20260723_175457.jpg
    2.3 MB · Views: 2
  • 20260723_181818.jpg
    20260723_181818.jpg
    2.1 MB · Views: 2
  • 20260723_181829.jpg
    20260723_181829.jpg
    2.8 MB · Views: 4
I just ordered a pair of subframe connectors from AMD. I'm going to weld them to the front and rear sub frames only at first, to help stabilize the unibody before cutting out the floor pans. I'm on the fence if I want to get floor pan halves or a full floor with the tunnel. My tunnel seems to be above the rust damaged areas, so I'm leaning towards the halves. The shipping will be less with the half sections vs the full. I'll also have to modify the tunnel anyway when I swap in the 8HP70 trans in the future.

Today I also ordered a dual fan aluminum radiator and a few other mundane maintenance type parts for the 360. So for now, I'm headed back out to deal with more of the rust while I wait for parts to arrive.
 
Well, that escalated quickly! 😳

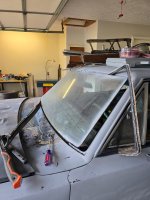
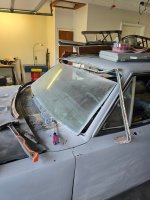
I was just trying to get access to the windshield trim clips so I could remove the rust with a wire wheel. What I ended up doing was pulling out the corner of the windshield gasket out like a loose hang nail. And I'm sure everybody knows what the knee-jerk reaction is to seeing a loose hang nail... 😖

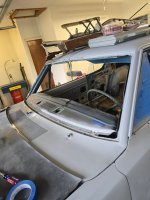
So anyway, now the windshield is out of the way. Since it was already cracked, I just folded it up and stuffed it into the big trash can. 😆

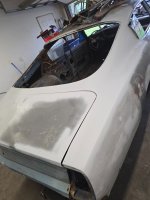
After that I tackled the surface rust on the top of the pass quarter, pass side of the back window, pass side cowl and A-pillar and the top of the pass fender. I cleaned up the sections as I went and gave it an acetone wipe before hitting it with primer sealer. I wanted to just hit the obviously rusty areas, but every time I tried to feather it out, I kept finding rust. Those primered areas I sprayed have been taken completely down to bare metal almost everywhere.

Once again I feel like I just got back from an all day fishing trip. All I caught was carp(al), and it's a big'un too. 😆
 

Attachments

  • 20260724_163010.jpg
    20260724_163010.jpg
    1.9 MB · Views: 5
  • 20260724_163133.jpg
    20260724_163133.jpg
    2 MB · Views: 7
  • 20260724_171917.jpg
    20260724_171917.jpg
    1.9 MB · Views: 4
  • 20260724_191600.jpg
    20260724_191600.jpg
    1.4 MB · Views: 4
  • 20260724_191621.jpg
    20260724_191621.jpg
    2.4 MB · Views: 5
There are a few areas in the window chanels with pin hole bubbles I'll need to address, but overall it seems decent. The bigger issue will be drilling out the remains of the trim clip screws that I had to cut off, without making the holes larger.
 
That sounds like a good plan. I still would want to weld any damaged holes shut to keep moisture out. Most of the clips are needing to get the screw heads ground off because there isn't enough solid steel left in the screw head for the screwdriver tip to grab. Either that or the screw heads are rusted away and the clip is already gone.
 
Last edited:
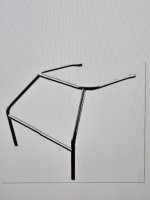
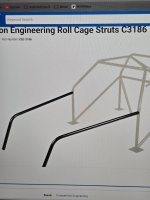
Initially I wanted to add a 4 point roll cage, but the more I think about it, I'm leaning towards doing a 6 point with forward subframe J-bar connectors. I don't plan on using any door bars on the cage for driver and passenger accessability. I'll obviously have to resolve the rusty floors issue before I can even consider adding the cage.

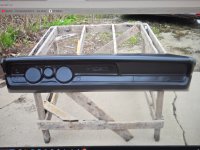
Rather than cut up the factory dash for the cage, I'm now planning to use a Glasstek fiberglass dash like I did with the R/T/A.

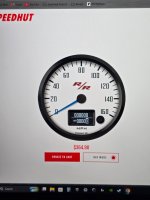
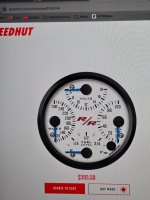
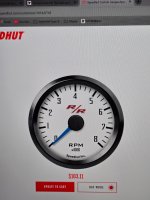
For the instruments, I'll go with three custom gauges from Speedhut, adding the R/R (rally rat) logo I made to the faces. The GPS speedo and quad gauge are 4.5" in diameter, and the tach is 2&5/8", all of which are similar to the factory gauges in size. The rest of the dash mounted controls will be adapted to the fg dash as required.

I'll likely sell off any unused parts that will be replaced with fiberglass like the dash, hood, fenders, header and valance panels. Any money I get from selling those parts will get rolled back into the project budget to help keep it moving forward.
 

Attachments

  • 20260725_131114.jpg
    20260725_131114.jpg
    2 MB · Views: 0
  • 20260725_131136.jpg
    20260725_131136.jpg
    2.4 MB · Views: 0
  • 20260725_131416.jpg
    20260725_131416.jpg
    1.3 MB · Views: 0
  • 20260725_131203.jpg
    20260725_131203.jpg
    964.8 KB · Views: 0
  • 20260725_131327.jpg
    20260725_131327.jpg
    2.8 MB · Views: 0
  • 20260725_131346.jpg
    20260725_131346.jpg
    2.3 MB · Views: 0
  • 20260725_131057.jpg
    20260725_131057.jpg
    2.6 MB · Views: 0
Last edited:
I think my garage qualifies as a sweat shop. Feels like 100+ degrees outside, and it feels hotter than that inside the garage. Anyway, that's enough crying from me. Back to the show!

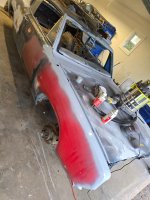
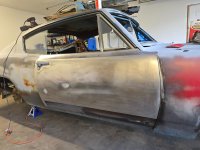
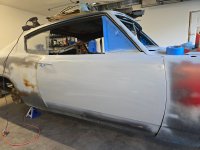
This is how far I'm taking the panels before applying the primer sealer. Only a couple small bondo spots on this door, thankfully. On the front half of the driver side door, and most of the side of the driver fender, I didn't find the base metal when I sanded them, so I stopped sanding before I made a huge wavy crater.
 

Attachments

  • 20260725_191604.jpg
    20260725_191604.jpg
    1.8 MB · Views: 2
  • 20260725_192637.jpg
    20260725_192637.jpg
    1.5 MB · Views: 2

SiteLock

SiteLock
Back
Top