69 Barracuda FB. The next evolution

Mo' progress...

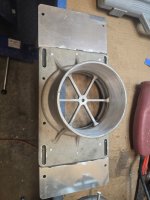
After removing the clamps, I installed six rivets to lock the two pieces together. On the inside area of the plate, I covered the ends of the rivets with RTV in case the rivet shanks ever try to pop loose. The air filter should keep them out if they did, but better safe than sorry.

Next I removed the existing air cleaner hold down rod and replaced it with a 18" piece of 1/4" all-thread. Once the base plate/riser and air filter were installed, I cut the rod to length.

With that done, I was finally able to set the scoop on the engine. Vertical alignment is good, but will need to be rechecked after I swap out the intake.

Overall I'm happy with how it sits, right now. If the new intake causes a substantial upward elevation change, the riser will be shortened at the bottom to get the scoop back to where it's sitting now.

Lastly, here's a pic showing how far the scoop is off the centerline of the car. The radio and heater controls are right on the centerline, so the scoop looks to be 2-3" towards the passenger side by comparison.
 

Attachments

  • 20261113_182728.jpg
    20261113_182728.jpg
    1.9 MB · Views: 2
  • 20261113_183137.jpg
    20261113_183137.jpg
    1.7 MB · Views: 2
  • 20261113_184806.jpg
    20261113_184806.jpg
    2.2 MB · Views: 2
  • 20261113_185002.jpg
    20261113_185002.jpg
    2.7 MB · Views: 2
  • 20261113_185026.jpg
    20261113_185026.jpg
    2.4 MB · Views: 2
  • 20261113_185056.jpg
    20261113_185056.jpg
    2.1 MB · Views: 2
  • 20261113_185356.jpg
    20261113_185356.jpg
    1.9 MB · Views: 2
  • 20261113_185404.jpg
    20261113_185404.jpg
    1.2 MB · Views: 1
  • 20261113_185853.jpg
    20261113_185853.jpg
    1.3 MB · Views: 2
It was the opposite for me. Drill and drill then oops I missed the center so it's still stuck. :poop:

I also found IME you're better off buying HF cutters than Blair because no matter how much you pay for the cutter, it's going to end up wrecked.

There's no avoiding the offset. Factory stuff through the hood could account for it but if you've gotta come straight up that's the way it is. You only look at one side at a time anyway.
 
I've never really used one of these cutters before. But for the price, and the fact it came from HF, I fully expect it to be a disposable tool. I just hope it makes it through this project before it turns into :poop:

The only reason the offset matters, to me in this case anyway, is those raised hood inserts. If the scoop were aligned dead center with the hood, the hole would fit between the inserts. With the offset, it looks like I'll need to cut into the pass side insert some. At least both the steel hood and the inserts are already in rough shape. It won't hurt as much to take the cutting wheel to the hood with how badly pitted it already is.

On a related note, last night I decided to replace the engine mounts before I commit to the hood cut. The existing mounts are of unknown age and likely sagging, possibly unevenly, which could affect the hole placement. I also want new mounts in there so I don't have to worry about the scoop hitting the hole in the hood when the engine is running. Since the 360 was transplanted into this car, and not a factory option for '68, I need to look and see if I have early or late style mounts before I order them.
 
Thankfully the engine mounts are the newer style which are easier to find. Both engine mounts appear to be inact, but the driver side mount is compressed more than the pass side. The trans mount doesn't appear blown out, but I'm replacing it anyway. I ordered two new engine mounts and a trans mount today from a LPS, which should arrive tomorrow.

While I was under the car looking at the trans mount, I looked around the area for any other issues. There is a missing bushing at the bottom of the shift linkage, and the neutral safety switch is missing the plug for the wiring. I'll need to source replacements for both of those parts.

The new intake is also supposed arrive tomorrow, along with a fuel pump block off plate.

The new mechanical fuel pump I installed a while ago is coming back out since I decided to run with the electric fuel pump. I just left it where it is until I picked up a block off plate to take it's place.

While out ordering the mounts today, I also picked up some new screws for the valve cover baffles, and some screws for the headlight retaining rings as well as a 8-32 tap and tap handle. Those broken baffle screws can now get fixed properly.
 

Attachments

  • 20261114_120027.jpg
    20261114_120027.jpg
    1.7 MB · Views: 6
  • 20261114_120039.jpg
    20261114_120039.jpg
    2.3 MB · Views: 4
  • 20261114_120608.jpg
    20261114_120608.jpg
    2 MB · Views: 5
  • 20261114_120734.jpg
    20261114_120734.jpg
    1.2 MB · Views: 4
  • 20261114_120756.jpg
    20261114_120756.jpg
    1.3 MB · Views: 6
Drilling those broken steel screws out of the aluminum valve covers was NOT fun. One hole on each of the valve covers is a bit oblong, but the threads are holding. I'm going to pick up some JB Weld to fill those two holes so I can drill and tap those again, properly this time.

BTW: Those bins of random impulse buy junk at the LPS are my kryptonite...
 

Attachments

  • 20261114_194529.jpg
    20261114_194529.jpg
    1.9 MB · Views: 4
  • 20261114_140340.jpg
    20261114_140340.jpg
    1.5 MB · Views: 4
I bolted the header panel loosely in place to get a look at it. It fits fine, but the threads the bolts go into need to have a tap run through them.

The new intake manifold and block off arrived today, so I started pulling stuff off the old intake. One thing I immediately noticed was that the crossover hose nipple in the new intake is too small for the threaded hole. The threaded hole for the heater hose is too small as well. There's enough material around that hole to step it up the next size to allow me to use the original size nipple.

The step up job was easy enough: drill with a 9/16 drill, tap hole with a 3/8NPT tap, wash out the chips.

Next job was to get some new bolts for the T-stat housing. The original bolts were too long and still a bit crusty, even after cleaning and painting them.

I picked up two more recessed NPT plugs, since the new intake has a couple more holes than the original. All three plugs were all installed and the temp sender was installed after that. Lastly, the splined plug caps were hammered into the bolt holes for use on a Magnum engine.

After all that was done, I taped off the carb flange, and the under side of the intake manifold. The intake was given a quick wash down with brake cleaner and then dried. I sprayed it with more gloss black VHT engine paint. The paint was mostly under the runners, in the valley tray and around the sides. I'll give the top side a coat after it dries and I can flip it over without getting my hands in the wet paint. Since the paint was already out, I went ahead and painted the scoop riser at the same time.

Anyone know a good source for a 3/4 NPT hose nipple? The nipple part should fit a 1" ID hose.

More to come...
 

Attachments

  • 20261115_113631.jpg
    20261115_113631.jpg
    2.4 MB · Views: 8
  • 72e2594b-c649-4604-a738-bca58071d9da.jpg
    72e2594b-c649-4604-a738-bca58071d9da.jpg
    1.3 MB · Views: 7
  • 20261115_134213.jpg
    20261115_134213.jpg
    1.4 MB · Views: 6
  • 20261115_134223.jpg
    20261115_134223.jpg
    1.6 MB · Views: 7
  • 20261115_162106.jpg
    20261115_162106.jpg
    1.7 MB · Views: 6
  • 20261115_164350.jpg
    20261115_164350.jpg
    1.4 MB · Views: 7
  • 20261115_164412.jpg
    20261115_164412.jpg
    1.9 MB · Views: 7
  • 20261115_172221.jpg
    20261115_172221.jpg
    2.3 MB · Views: 7
  • 20261115_172228.jpg
    20261115_172228.jpg
    1.7 MB · Views: 9
Last night, after it was dried enough, I flipped over the intake and applied paint to the top side. In the morning I pulled the intake and valve covers off the 360. It seems like whoever stuck the intake on REALLY liked to solve problems with RTV. The shop vac cleared the debris that fell into the lifter valley.

With the old intake off, I was able to set it next to the new one to check the height difference. First I put shims under the intakes to get the bolt holes sitting at the same height. Then I was able to use a speed square and a straight edge on the carb bases to get an actual measurement. The new intake is about 1/2" taller, and it's carb base area is sitting further back than the original.

Next, the new valve covers were installed and they fit good. The openings on top of each valve cover have sharp edges that I need to smooth out before the rubber grommets will fit.

Lastly, I removed the mechanical fuel pump. When I tried to install the block off plate, the new socket head bolts would only grab one thread. Turns out the plate came shipped with metric bolts. After a quick trip to the LPS with both old and new bolts, I found two bolts that would work. The block off plate went on without issue with the correct bolts. I did use thread sealant on the bolt closer to the engine block since it was open to the inside of the timing cover at the bottom of the hole.

My back is telling me to take a break, so the new intake will have to go on later.
 

Attachments

  • 20261116_142442.jpg
    20261116_142442.jpg
    2.9 MB · Views: 6
  • 20261116_144347.jpg
    20261116_144347.jpg
    1.5 MB · Views: 4
  • 20261116_144308.jpg
    20261116_144308.jpg
    1.2 MB · Views: 4
  • 20261116_145608.jpg
    20261116_145608.jpg
    2.8 MB · Views: 4
  • 20261116_150355.jpg
    20261116_150355.jpg
    1.6 MB · Views: 5
Break over, so back out to the garage for a while.

First, I set some new shop rags into the lifter valley to keep out the crud. I used a scraper to remove the old gasket residue, keeping most of it on the rags. The stuff that got past the rags got vacuumed up. What the razor blades couldn't remove got sprayed with PB Blaster and scrubbed with a green 3M scouring pad. With that done, the surfaces were ready for the new gaskets.

Then I wanted to test fit the intake, so I peeled the tape off and tried to sit in on the engine. The tops of the intake runners were being held up by the valve covers. I've run into this problem before with some other intake/valve cover combos, which is why I wanted to do a test fit. I pulled the valve covers so I could set the intake in place. Doing this confirmed the cork end gaskets were holding the intake up higher than it should be. I know the cork would squish some, but it would have to compress to at least half it's current thickness. I'm going to replace the cork with an appropriately sized bead of RTV. I'm going to try to only put enough down so it doesn't squish inward as much as the previous RTV application.

With the intake sitting in place, I sat the valve covers on the heads to see where they hit the intake. I stuck blue tape to the edge of the valve covers and marked the points of contact. Now I have a guide where to trim the edge of the valve covers for clearance.

That's all for tonight.
 

Attachments

  • 20261116_221734.jpg
    20261116_221734.jpg
    3 MB · Views: 5
  • 20261116_222341.jpg
    20261116_222341.jpg
    3.2 MB · Views: 3
  • 20261116_223739.jpg
    20261116_223739.jpg
    2.1 MB · Views: 2
  • 20261116_223745.jpg
    20261116_223745.jpg
    2.5 MB · Views: 3
  • 20261116_224349.jpg
    20261116_224349.jpg
    2.9 MB · Views: 5
I sat the valve covers on the heads to see where they hit the intake
Once I was removing a 340 intake, and thought it was stuck with the gasket. It and got to the point of grabbing the handy cherry picker and picking the car up on its suspension by the intake before I realized the intake was stuck under the valve covers.
 
Once I was removing a 340 intake, and thought it was stuck with the gasket. It and got to the point of grabbing the handy cherry picker and picking the car up on its suspension by the intake before I realized the intake was stuck under the valve covers.
Luckily I've previously figured out this issue during intake installs, rather than removal. It seems to be more of an issue with the cast valve cover and aluminum intake combo. Stamped steel valve covers are a pretty safe bet clearance wise.

Hopefully your valve covers survived the hoist assisted removal attempt. My barracudas' trunk latch mount got deleted when the guy delivering the car tried lifting the rear of the car with my engine hoist to get it off the roll back. The car wouldn't budge because he left it in park while trying to roll it off the truck ramp. Doh!
 

SiteLock

SiteLock
Back
Top