My 71 Duster work in progress

I think of priming as more of pre-flooding the passages. I've had my share of deep well water pumps that lose prime and cause trouble but I've never heard of an oil pump not taking off unless something is wrong with it. Once the motor fires it's spinning as far or faster than my little hand drill.

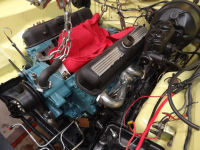
Maybe it was more debating myself over putting the intake on it first so I could use the lift plate bolted to the carb flange. I decided against that for now, probably until the day before I fire the motor. That's a piece of the cardboard out of my gasket kit covering the valley for the time being.
1710619309158.jpeg
1710619255231.jpeg
1710619226203.jpeg

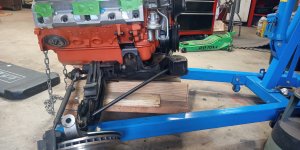
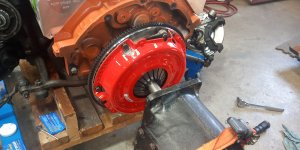
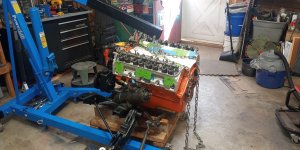
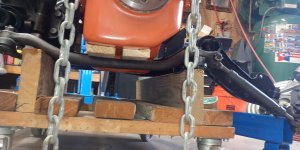
See in the last photo, the front of the k-frame isn't touching the cart so most of the weight is on the back wheels. After I've got the flywheel on I'll pick it all up and shove the cart reward as far as possible to get some more weight on the front wheels. To be safe I'll keep it hooked to the picker until I've got the transmission and jack under the far end of the assembly.
 
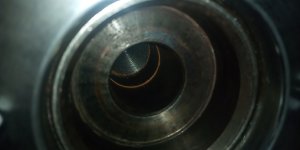
This looks like it might be reamed for a bushing, but I'm not sure it's worth a couple of days wait to get one, since I have a pilot bearing in hand.

20240316_170058.jpg

I'm guessing it doesn't matter what goes on first, the flywheel or the pilot bearing but I'm thinking it might be easier to tell when I'm done if I drive the bearing in first. Also guessing the right tool to install the bearing is a big socket and a bigger hammer.
 
Of course I found a pilot bushing in with the clutch/PP/TO bearing after I drove the pilot bearing in. Oh well.

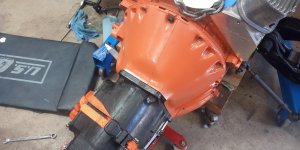
I did not get the transmission in. I've got the top on long headless bolts, and long bolts started in the bottom holes, but it goes so far and stops. I felt it slip into the splines so that's not the problem.

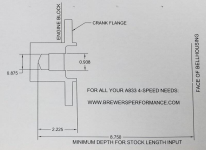
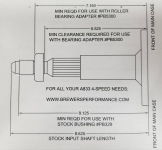
The alignment tool slips all the way in. I roughly measured the depth available from the bottom of the pilot hole to the face of the bellhousing and got 9". I measured from the tip of the input shaft to the face of the transmission and got 8.5". So the hole is deep enough. About to sanity check my measurements with a diagram I've seen from Brewer's.

I remember a tip to loosen up the PP bolts. Will try that on next attempt. That fucker is too heavy to keep fighting so I need a break before my back is broke. Then I imagine doing this laying on my back under a car, so this is definitely the easier way to get er done. Things are definitely heavier now that I'm an old.

I do have a problem with putting things together and torquing bolts too soon. I've had the bell off twice now and still torqued the bolts the second time. When I was looking at a transmission that still wouldn't go in I thought to myself "Self, next time only put a couple of bolts in."

It also seems like there is little chance I can put the TO bearing on the fork without taking the bell off. So yeah it's definitely got to come back off at least one more time.
 
1710681286414.png
1710681298939.png

That checks out per my measurement so it's not the hole. Using the splined alignment tool, it should be lined up, but hopefully loosening the PP will give me enough play to get it to wiggle in.

Also - I had to pick up on the assembly to get it to align with my jack, so when I straddle the trans and try to wrestle it the rest of the way in, the whole thing kind of moves. It might help to see if I can make things more stable so when I lift and tug on the trans, only the trans moves.
 
Last edited:
Lesson learned
1. Don't tighten the pressure plate up until the transmission is mounted
2. Just because you had the transmission in without the bell housing when you torqued the pressure plate bolts doesn't mean the transmission will just go right back in.
20240317_110808.jpg
20240317_121623.jpg
The bright side is I only have to tighten the PP bolts one more time.
 
Don't feel bad, I never tightened the flywheel on the last car, wondering what my extreme rattle was, got lucky with a couple of long bolts I was able to back the tranny out enough to get to the bolts, this car is torqued & lock tighted!
 
Lesson learned
1. Don't tighten the pressure plate up until the transmission is mounted
2. Just because you had the transmission in without the bell housing when you torqued the pressure plate bolts doesn't mean the transmission will just go right back in.
View attachment 27315

The bright side is I only have to tighten the PP bolts one more time.
Judging by the dimension you gave, I would say that aligning the disc to the pilot bearing without the bell did not align the bearing retainer to the bell opening. You may have noticed that without the bell you can move the trans up 'n' down quite a bit.
 
Judging by the dimension you gave, I would say that aligning the disc to the pilot bearing without the bell did not align the bearing retainer to the bell opening. You may have noticed that without the bell you can move the trans up 'n' down quite a bit.
You're probably right but the retainer was a about an inch away from the bellhousing at that point.

It's in now though.

Something I didn't consider - the passenger side header will bolt straight on, but it looks like I'm going to have to pick the engine up off the k-frame (and away from the steering box) to get the driver's side on. Should've put those on first I guess.

Once that's done I'm holding out hope I can get enough of the engine under the car so I can get the picker close enough to the car to grab the rad support to lift it high enough to get the engine all the way under.
 
Last edited:
You should've been able to fully torque the pressure plate while using the alignment tool. I suspect the fact that you used a pilot bearing v. a pilot bushing made the difference, even moreso if it's the Dakota pilot bearing (a.k.a. the "conversion" bearing that rides in a collar the converter recess). The bearing doesn't fit the input shaft as tightly as a bushing, and the alignment tool isn't as precise as the actual input pilot.

I don't remember which headers you're using, but most non-TTi LA headers with which I've dealt require the steering linkage to pass between tubes on the driver's side. I can't remember if that was the case with my Doug Thorleys though (not Doug's, which is a different company entirely).
Yeah all it takes is a fraction of an angle and you're in the splines but not going in that bearing. There's about an inch less space between the splines and having to get it in the bearing/bushing because of that.

These are Doug's D-453. I want to say they don't capture the suspension but might be wrong. The internet says they go above the drag link. From the instructions, that I just read "Remove nut from ball and socket end of pitman arm and separate the center link from thepitman arm and allow it drop out of the way." I was done when I got them things unboxed and it wasn't going straight on so I just shut the door.

From Picture of Doug's D453 headers steering clearance

1710782091053.png

I didn't get coated because it's likely to burn after running it anyway. So they're black to start with. In that thread some people beat the hell out of them so much for ceramic coating. I know to leave the hammer alone and shim the engine up a little bit.

I gotta quit reading the internet. Today I see a guy praising run stands because he had a leaking rear main at startup and didn't have to pull it all back out to fix it.
 
Last edited:
Yeah all it takes is a fraction of an angle and you're in the splines but not going in that bearing. There's about an inch less space between the splines and having to get it in the bearing/bushing because of that.
I'm sure some of that is that with the bushing in its correct spot on the crank, you've got further to go before you engage it, and probably keeping the transmission more level at that point.

These are Doug's D-453. I want to say they don't capture the suspension but might be wrong. The internet says they go above the drag link. From the instructions, that I just read "Remove nut from ball and socket end of pitman arm and separate the center link from thepitman arm and allow it drop out of the way." I was done when I got them things unboxed and it wasn't going straight on so I just shut the door.
If that's what's said about them, I have no reason to believe otherwise.

I didn't get coated because it's likely to burn after running it anyway. So they're black to start with. In that thread some people beat the hell out of them so much for ceramic coating. I know to leave the hammer alone and shim the engine up a little bit.
Unless you go way lean or retard the hell out of the timing during cam break-in, the coating should've survived without issue. Usually if anything's needed it's just a quick pass with some metal polish. Those coatings are extremely durable in the long run. I've got friends with headers 25+ years old that still look essentially new.

I didn't get my TTis coated for two reasons: I was working within a stated budget target, and the only coating TTi offered looks exactly like the stuff in your posted picture. To me, that looks absolutely dreadful. Why on Earth would one want headers to be a focal point? To show how much money was spent? I used a little VHT Cast Iron and a propane torch. My headers still look good five years later without trying to be the star of the engine bay.
 
I think of priming as more of pre-flooding the passages. I've had my share of deep well water pumps that lose prime and cause trouble but I've never heard of an oil pump not taking off unless something is wrong with it. Once the motor fires it's spinning as far or faster than my little hand drill.
The passages will drain back to empty within hours. The sole exception would be part of the passage coming out of the filter, assuming your filter has an anti-drainback valve. None of the other oil passages are anywhere near airtight, much less "oil-tight". The lifter galleys will drain out through the mains, and the head passages will leak out at the cam. The rocker shafts will drain through the rockers.

The whole point of assembly lube is to keep everything slippery until oil arrives. Assembly lube dilutes/dissolves in oil. Pre-oiling the system beyond priming the pump just prior to startup accomplishes nada except washing away the assembly lubricant.
 
I'm sure some of that is that with the bushing in its correct spot on the crank, you've got further to go before you engage it, and probably keeping the transmission more level at that point.


If that's what's said about them, I have no reason to believe otherwise.


Unless you go way lean or retard the hell out of the timing during cam break-in, the coating should've survived without issue. Usually if anything's needed it's just a quick pass with some metal polish. Those coatings are extremely durable in the long run. I've got friends with headers 25+ years old that still look essentially new.

I didn't get my TTis coated for two reasons: I was working within a stated budget target, and the only coating TTi offered looks exactly like the stuff in your posted picture. To me, that looks absolutely dreadful. Why on Earth would one want headers to be a focal point? To show how much money was spent? I used a little VHT Cast Iron and a propane torch. My headers still look good five years later without trying to be the star of the engine bay.
I agree with you about the headers. The Schumacher headers I've got are coated silver like that too.

I grew up in an era when if your headers weren't VHT white you weren't cool but I haven't painted headers for decades. Keep the car dry, don't park it long term in the yard, and run it enough to dry out the inside and they'll last forever with the factory finish on them. Especially nice headers, and these *are* nice.
 
I grew up in an era when if your headers weren't VHT white you weren't cool but I haven't painted headers for decades. Keep the car dry, don't park it long term in the yard, and run it enough to dry out the inside and they'll last forever with the factory finish on them. Especially nice headers, and these *are* nice.
I've looked at a lot of cars with white headers over the years. In fact, I still know of one sitting in storage since 1992 or so. White headers were all the rage when Hijackers and Keystone Klassics ruled the streets. I've seen several cars with red-orange VHT on the headers as well.

The first pair of headers I installed were Blackjack (remember those?) and the next set were Hedmans. In both cases, the paint started jumping off the pipes before the car was even warm on first startup. Set #3 were Hedman and it was on those that I first my process of stripping and refinishing them, using a propane torch to get them hot prior to, and during, painting. I refinished some used headers around 2001 that ended up on Stretch's Charger after a couple of years of wall duty in my garage. They're showing some age, but that's 20+ years and they're still of no concern to him. Of course, the TTis saved me the hassle of stripping since they were already bare steel.

I have a new (NOS?) set of Hooker Darkside headers in the NLA dark gray finish for the Challenger, but I'm seriously considering another set of TTi headers for the car instead. I can't swear the TTi fit is dramatically better, but the fact that the outlets point through the actual exhaust clearances in the T-bar crossmember is so nice when hanging pipes.
 
These Doug's headers are highly recommended for an a-body. Believe it or not I got them from AutoZone way cheaper than anyone else. I described all that way up thread. I can't get google to show me a photo of an installed set from underneath so who knows if they line up with the frame or even with the exhaust that's hanging on the car now. They are about half price of TTIs though. I can't imagine TTIs are better made, but maybe the fit makes up for the price difference.

I may take the headers to the powder coater after I've put them on so any beating and banging is done before making them pretty. There's a local place that has been operational for years and if they can turn them around in a week or less I may go for it. If they can do it in color, these might be white :D

I am definitely in the Hijackers and Keystone Klassics generation, and don't forget Lakewood traction bars.

Speaking of which, I've got a set of practically new b-body air shocks that I'd love to give away to someone who needs them. Don't remember the brand, but they're white. They've been laying around for years probably predating my join date here.

Unrelated to everything, I remember that Grumpy Jenkins painted things white, to help him see what he was doing during late night thrashes.
 
Duckduckgo has a much better image search than Gargle, for the record. A few nice shots of 'em here.

Local powder coaters are generally able to do ceramic coating. It's more about the media than it is the process; in fact, the process is the same, you just need the ceramic media. It's available in a lot of colors, so white should be easy enough. A friend recently had his girlfriend's 340 exhaust manifolds coated in a cast-iron gray at a local powdercoating shop in GA. He's very impressed with the results, and it was less expensive than the extortive prices he was getting from the big guys.

I can't say I know anyone in the market for air shocks anymore. I think we've all learned our lesson about the carnage they create on the upper shock crossmember. 😄
 
Perfect, just perfect.

I raised the engine up off the k-frame and cart, put the DS header on with just the end bolts holding it, and started letting it down real carefully. Then I realized that the header was going to sit right down on the cart. Oops.

First alternative that comes to mind is to put the engine/kframe in, then pick the engine off off the mount up enough to get the header in.

I wish I could just move the assembly rearward on the cart but if I do that, then there's too much cart out front to reach the car with the picker.

Unsure if this hassle is worth it, but then I think about installing the PP/clutch/bellhousing/transmission laying on my back and think yeah it was.

Another alternative is to build a different cart and switch cart a for cart b. I needed the extra length before so the center link sat on it to hold the rear end of the kframe up. Now that the transmission is on, all I need is enough cart to go under the kframe so I can roll it under.

I just don't want to leave the assembly hanging on the picker because it slowly bleeds off - and I'm not sure how slowly it happens. I could just sit the whole thing on 4x4 blocks if necessary, but I don't trust it enough to leave it hanging.
 
I am definitely in the... Keystone Klassics generation...
I hate when people spell things with "k" for "c" almost most as much as I hate those who use "z" for "s"

Powder & Ceramic Coating | Kustom Koatings | Huntington WV
😁

Make no mistake, I agree with you 100% but the mild irony was too much fun.

Google is all about the sales. We'll see how long it takes duckduckgo to figure it out and go that way too.
Actually, it's not that at all. Google for some reason has a vendetta against hotlinks, whereas DDG's attitude is "If you don't want your shit hot-linked, don't put it on the Web." DDG is not alone in that.

Since Google is the greatest evil on Earth right now, I've been migrating away from it. Trying to find a suitable e-mail server so I can dump resource-hogging, spyware Gmail and be done with Satan's minions once and for all.

First alternative that comes to mind is to put the engine/kframe in, then pick the engine off off the mount up enough to get the header in.
I'm 95% certain this is the route I'd take. It seems like the least amount of screwing around for the most amount of progress. Doing more work to make it easier isn't actually easier.
No, I didn't have a power steering box with which to deal, but realistically my experience with the TTi headers is that they were actually quite easy to install with just the engine lifted (quite different from my experiences with lesser brands of headers). I would expect the Doug's to be a similar experience (which is not the case with their early-A headers). If you don't have to mess with the steering linkage, and it appears you don't, it should be fairly straightforward. You can also install them prior to installing the torsion bars, which gives you extra wiggle room. If the column is out, that's another boon but again, my headers weren't that difficult even with large primaries. They went in with the torsion bars and column already in place... but not the starter, which was a huge mistake. Blowproof bell + large-primary headers = frustrated Jass. Y'know what? Not only should you have the starter in place, you'd do well to already have the positive cable and trigger wire secured to it. Connecting the wires to the starter was somewhere southwest of fun, too. You can easily re-route the cable to the inner fender and battery later. Getting the terminals in place and fastened around headers can be a joyless endeavor.
 
I'm 95% certain this is the route I'd take. It seems like the least amount of screwing around for the most amount of progress. Doing more work to make it easier isn't actually easier.
If I knew I could make a smaller cart in about an hour, that seems inifinitely easier than putting the motor in to take it half way back out for the headers. But I'm not convinced yet. It really only needs to be the size of the k-frame. The one I've got is just the size it was, I just added the uprights to raise the engine above the cart.

If you don't have to mess with the steering linkage, and it appears you don't
The instructions I linked above say the drag link has to be disconnected on the driver's side. With it on the cart, I don't need to because they go above the link and I can pick it up as high as necessary to bolt them to the engine. It's not a big deal, but that's one less thing I have to mess around with.

You can also install them prior to installing the torsion bars
Agreed that frees up some room.

If the column is out
It is so I've got that going for me.

Not only should you have the starter in place, you'd do well to already have the positive cable and trigger wire secured to it
Good point, I'll do that tonight before I forget.
 

SiteLock

SiteLock
Back
Top