Rusty's not very quiet cuda progress

Jass don't go crazy yet, let me poke around a bit & see if I can narrow some things down a bit.
I have to try & get another set of hands here so I can test power at the relay when the key is turned,
& depending on who it is, charger man may have a few ideas, if it my son, then it's on my foggy brain!
 
OK some forward progress, thought I found the rear lights problem, I missed a ground, cleaned the paint off the nut & hooked that up but they still don't work.
20240404_121926.jpg
On to the starting, put it in neutral & she spun from the key Yea!
put it back in park & again it spun from the key, that lever must have been a tad out of place!
Tried reverse & still no back up lights.
So I redid the spin to compression on #1, pulled up the pump shaft, had to do it a couple of times it spins quite a bit on the way in, but got it to the front drivers manifold bolt. 20240404_125911.jpgSo I pointed the vacuum thingie to the pass. side & dropped the distributor in, rotor also pointing to the bolt.


Hmmmm, looks like the contact to the cap in on the other end, Am I 180 off

20240404_130351.jpg
Had to go back to the book, it had 2 # 1's on it, small block said clockwise, that is also to #1 20240404_131138.jpg
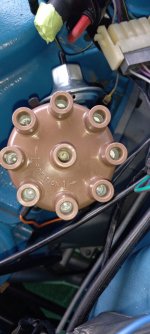
now I have to figure out the plug wires, I'll follow the book & hope I don't screw that up!

Oh yea that annoying key buzzer finally turned off after I cranked it a few times, I had actually looked under the pass side of dash to pull the wires but can't get to it anymore with heater & glove boxes in!
 
Last edited:
So waiting on you guys to confirm I have the distributor 180 out I did a few other little things.
Confirmed my fire wall is grounded, there was a nice scratch with bare metal above the connection point, so I checked continuity from the motor ground to that & it was good. 20240404_150026.jpgNow I'm not sure those knobs will go in any further, the hole is not that deep, but I think they are missing the spring clips, pretty sure there should be a piece of metal in the slot??? 20240404_150556.jpg
(plug wire layout ready for me!)
So I mixed up some blue to do the touch up on the door, figured what the hey, I tried the knob, not great but it's blue! 20240404_153045.jpg& then stuck on my battery tray brace, rather than a nut & bolt on the battery side I tried it on the existing post, fit well so I put it there! 20240404_154118.jpg& on a brighter note the rest of the A/C parts came20240404_144818.jpgOn the darker side , not even a note about any instructions, will call them to see if there's anything available, there's way to many things to have to guess at in those boxes!
 
Am I 180 off

20240404_150556.jpg
That diagram says no you're not 180 out but I don' t think it's quite right either.

I'm not sure about the relationship between the intermediate drive slot and where the rotor points.
 
The instructions I copied that Jass posted for me say point at front drivers manifold bolt, it's almost right on.
that diagram looks to be pointed to the passenger side, I'll wait for Jass to check in & see what he thinks.

I watched 3 videos on this, all three guys said different things, one had the same side as me pointed to #1 area, the other had the fat end pointed to that area & the third guy didn't even look & said it didn't matter.

I'd put more faith in the instructions Jass posted, now if I did it all correct is another matter to be determined when I try to start it, pass or fail!
 
IIRC Jass was talking about the intermediate shaft slot, not the rotor.

Yes, he was

If you do, the slot in the pump drive should be pointing at (approximately) the driver's side front intake-manifold bolt. If it's off by a little in either direction, don't sweat it. I doubt the factory did.

That's why I said I was unsure about the relationship between the rotor and the slot.
 
Rotor seemed to point in the same direction as the slot, it's just which end of the rotor should be to the front now I think?
 
Last edited:
Rotor seemed to point in the same direction as the slot, it's just which end of the rotor should be to the front now I think?
The bottom of the shaft has 6 flat sides, equally spaced, So spinning the shaft so the other end is the "point" would end in the same location. The rotor should point to the correct #1 spot on the cap. If not, move the shaft one gear tooth in the correct direction. (Or rotate the dist that far if you can)
 
The bottom of the shaft has 6 flat sides, equally spaced, So spinning the shaft so the other end is the "point" would end in the same location. The rotor should point to the correct #1 spot on the cap. If not, move the shaft one gear tooth in the correct direction. (Or rotate the dist that far if you can)
That's the point ... the way the intermediate shaft slot points is of no consequence other than limiting where the rotor points. The way the rotor points doesn't really matter either, so long as you have it pointing at the terminal with the wire connected to #1 and the wires are in CW order 184365732.

But, if you don't get it to point to the right place, every time you work on the ignition that CW #1 cast into the distributor cap will be staring you in the face to remind you of of this slackitude :D
 
OK, it is pointing to the correct # 1 on the cap but it's the short skinny end of the rotor, the contact to the cap is on the fat end, soooooo, which end is correct, everything else worked as per instructions Jass posted, I'll get that sheet & double check everything!
 
OK went back over it, I think it should be pointed more forward, but it's on #1 spot, gotta see what happens if I just turn the distributor?

Still need fat & skinny to race so I get that right!
 
You should be good to go as-is. It's hard to tell when the angle's changed between photographs, but as long as the metal tang on the rotor is under (or near to it) the #1 terminal on the cap, you should be OK to fire it. I'd have a timing light ready to go when you do. You don't need to actually tune anything immediately, but you'll at least want to make sure it's advanced a little bit, even if it's only 2-3°. You can fine-tune it later.
 
OK, also went out & there was plenty of "turn" in the distributor to point the #1 mark forward.
So as it is skinny metal side of the rotor is forward as in the diagram in the book.
In a few days I'll get to see what blows! 20240405_172253.jpg
 
Little tiny bit of forward progress, Mark (charger man) stopped over & we messed with the rear lights a bit, we had power to the connector behind the kick panel & continuity to the rear, found the drivers side 1157 out, once that was replaced I now have tail & brake lights, still no reverse, markers or turn signals, will replace some fuses tomorrow & see if maybe ones out?

Not sure about the foot dimmer switch, it did switch from low to hi but didn't seem to click in to hold the highs on?

So I put the plug wire in, not happy at all with those, I had straight boots at the plugs on the other car much better, I'll put the brackets in & see if I can save these, otherwise it's a new set & I'll get the straight boots!
20240406_163033.jpg20240406_163102.jpgUpon entering the house a nice surprise was awaiting me, the hocky stripes came, I was getting nervous about this order, I never heard a peep from the company, all I had was a pay pal receipt!
Not even a we got the order email? 20240406_163713.jpgInstructions look good, did come with the squeegee & the part for the door is a separate piece.
 
Last edited:
Mark said he might stop over later, so I've been trying to prep for a startup try, He knows a lot more than I do!

So I had to put the wire holders that were on there back, factory ones pretty useless with these wires.
drivers side not terrible....................20240407_111259.jpgPassenger side a little creative bending of the bracket & makes it livable. 20240407_111331.jpg
All the wires are NOT laying on the headers!

Ran the distributor & A/C vac lines up to the carb, I also have a port on the manifold fitting I could use, I think the A/C may go there? 20240407_114104.jpgGreen tape on port.

Either way the lines are long enough for either side of the carb or that fitting, what say ye?
20240407_114113.jpg
Gonna go pick up some more gas only had bout 3 gals. here.

Looking at the old wiper arms, not sure where the chrome one came from, but I'd like to leave them natural, any tricks to cleaning up short of wire brushing the old finish off?
20240407_115713.jpg
 
OK, she runs, barley, got a little video to load but too large for direct to here work on that later.

Couple questions did come up, what marks to I go by to set the timing/ 0 on the wheel to the 5btdc on the casing?

Vacuum is low barley 4" ish, does go up a little with a little gas?

20240407_145133.jpg
that is plugged into the big fitting on the back of the manifold, was a tad less at the carb.

had a few leaks, couple of heater hoses, got those tightened up & a fuel leak at the carb, think it's the new fitting right on the carb, can I put a coat of ye ole indian on the metal washer maybe that will seal it, I had tightened it twice to no avail, afraid to break something? 20240407_160529.jpg
& this last carb port with red cap, what should be on here?20240407_150433.jpg
 

SiteLock

SiteLock
Back
Top